Thursday, May 30, 2013

A Fond Farewell...


Hi everyone. I want to start off by saying thanks to all the amazing group of ladies I had the pleasure of working with here at Globecraft & Piccolo. I will be moving on to new ventures and crafty fun, but rest assured the returning and new ladies coming up are FANTABULOUS. I can't wait to see all the new projects they will be sharing with all of us.

Monica Edwards
Simply Monica
For my post today I created this Fancy Hanging Header from G&P. I thought the sentiment went well for the occasion today. Love Starts with a Smile, Grows with a Kiss and Ends with a Tear! These tears are tears of the joy for sure.

I outlined the back piece with this flower trim to give it a ruffled look as I layered the additional pieces.


This is a look at the piece .


 Header.


This piece here I actually added on to the end - it is the ending to the sentiment.


Here is the entire finished piece.


I hope everyone has enjoyed my projects here with Globecraft and always remember to Create, Share and Inspire!

Hugs,
Monica

Monday, May 27, 2013

Canned Chicken


Hi! It's Candy back to share a scrapbook layout with you.

With Globecraft & Piccolo products, it is easy to add the look of metal to your scrapbook pages without the bulk or the weight.

Candy Spiegel
Candy Scraps
Supplies:

On this page, I used pre-cut Grungeboard letters by Tim Holtz and covered them with Vintage Silver embossing powder.


Then, I created my own metal flowers out of cardstock.

First, I die cut the Tattered Flowers by Tim Holtz die using American Crafts Cardstock. Then, I used an embossing folder to add texture to the flowers. Finally, I added Real Rust, Vintage Silver and Vintage Gold embossing powders to the flowers. 

I used brads to attach them. You can also bend them slightly to provide a bit of dimension, but be careful not to bend too far or the powder will crack. (If that happens, just reheat the flower and you can make the crack vanish.)


I also covered plain wooden buttons in Real Rust Embossing Powder and added a bit of twine for a finishing touch. You can see how I did that, here.


For a tip on storing your embossing powders, visit my blog.

Friday, May 24, 2013

A Mother's Day doily


Hi there, it's Steph again.

Do you remember the tips I showed for creating fun doilies? Well today, I wanted to show you what I actually did with one of those doilies.


Steph Ackerman
Live, Laugh, Scrap


Supplies:


As I needed Mother's Day cards,  I thought the doilies would work well for a backdrop on the card. I chose to create with the Poodle Skirt embossed doily. When you emboss the doily with these wonderful embossing powders, the doily becomes firm and fun to create with. Just be gentle when adding the Embossing Powder so the doily doesn't tear.

I stamped my image on white cardstock and used Pink Rose 3D Enamel Gel on the flowers - just a little dot on the flower centers was all that I needed. When it dried I had this nice 3D effect.


I mounted my image on the Poodle Skirt embossed doily.


I then created my card by using this piece as the focal point and adding a stamped sentiment in the corner.


Look at the shine on that doily from using Poodle Skirt Embossing Powder!


Thanks for stopping by today and be sure to stop by my blog to see what else I've been creating.

Monday, May 20, 2013

Making faux glass beads with UV Resin


Hey, it's Laura today. I have an interesting project originally suggested by Pat from Globecraft - Faux Glass Beads made with UV Resin. I had so much fun, that I made two. And, for my friends who are Red Wing fans ...


Read on to see how they were made.

Materials:
Laura Drahozal
Remembering Life's Moments

Directions:
1) Wrap the end of one of the skewers with masking tape. Slip a bead on and wrap again. The skewers will hold the beads through the creative process.


2) Paint the beads with the white acrylic paint. I used a sponge brush, but you can use any type of brush you have.


3) Use the pencil to lightly draw your design on the paint, if desired. Be warned that the pencil will show through when you are finished!


4) Apply the 3D Gel Colors. I used the fine tip to apply the gels on the octopus.


When you apply the gels directly from the bottle like that, they can go on pretty thick. If you don't let them dry in between, the colors swirl and blend - an effect that I liked for the octopus. Of course, I let it dry before I added the red, as I did not want a red octopus. Also, wherever you apply the gels heavily, gravity will cause it to pool a little.


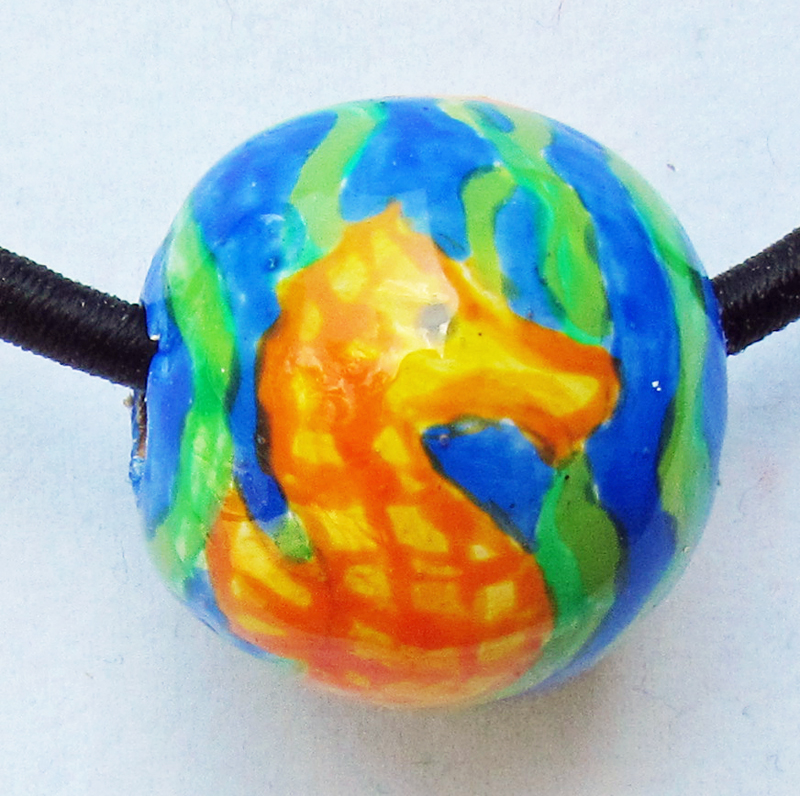
For the seahorse, I put some of the gels on my craft sheet. That way, I could blend colors and pick them up with my tools.


Then, I used a fine brush to apply the color. It went on thinner, so it dried quicker.


I applied details on the seahorses with a toothpick.


Because I applied them thinner, I did not have to wait for the foreground to dry before I applied the background. You can see that I used my jar to hold the beads while they dried.

5) While my beads dried completely, I used the wire to create a spit of sorts. That way, I had something to cure my beads on.


6) After the 3D Gel was completely dry, I applied the UV Resin. I squeezed it directly from the container, and then used a cheap brush to even it out.


7)  Remember the gravity I mentioned earlier? Well, we are going to get around it the same way that professional glass artists do - we are going to slowly spin the bead so that it doesn't all pool in the same spot. So, place your skewer on the spit and the spit into the UV light and slowly spin it for the 3 minutes it would take to cure. Alternatively, you could skip the spit entirely, take you project outside in the bright sunlight and cure it there. Don't forget to spin the beads, though!


8) You're done! Now, you can use your beads in a project, or simply do what I did here and slip it over one of the Globecraft necklaces.

Here are a few more shots of the beads:


Thanks for stopping by today. You are welcome to come join me at my blog, too, www.rememberinglifesmoments.blogspot.com. Better yet, become a follower (I love followers)! Today, I will be featuring a cute little gift that I made for my niece with Globecraft products. I have a full tutorial. Here is a peek:

Friday, May 17, 2013

Flight of Butterflies Pendant


Hello! Tracy here again with another tutorial! With this tutorial I will be showing you how to use G&P products and papercrafting supplies to make a simple but beautiful butterfly pendant.

Tracy Alden
Art Ressurected
Supplies:
  • G&P Piccolo Instant UV Resin
  • G&P Assorted Acrylic Tag Bezels set (Large circle bezel)
  • G&P Glastique Gloss Finishing Glaze
  • G&P Interchangeable Gold Bail
  • G&P  Pink Pearl Real Silk Cord Necklace
  • G&P Shamrock Dreams Embossing Powder
  • G&P Ruby Red Slippers Embossing Powder
  • G&P Piccolo Embossing Powder Adhesive
  • G&P Bookboard Floral Flourishes F006
  • Piccolo Easy Grip Tweezers
  • Sharp craft scissors
  • spoon
  • Xyron 2.5 Create-a-sticker (permanent adhesive)
  • DCWV Mariposa Matstack
  • Paper House Productions Butterflies stickers
  • Art Glitter Frost Ultra fine Glitter
  • Gold glass microbeads
  • 2 gold tone jump rings

Carefully peel off the blue plastic coating from the side you want to be the back of the acrylic bezel. Place the acrylic bezel on your chosen piece of cardstock and cut out a section, using the bezel as a guide. You don’t have to be super neat you will be trimming the cardstock to size later. This will become the background for your pendant.


Run the now finished piece of cardstock through the Xyron 2.5" Sticker Maker, making sure to place the printed and decorated section of the cardstock is facedown in the sticker maker. Once the cardstock goes through the sticker maker peel off the paper and apply the cardstock to the back of the acrylic bezel. Use a spoon to burnish the sticker and ensure a good bond. Apply a thin coat of G&P Glastique Gloss Finishing Glaze on the back of the cardstock. Let dry.


Carefully remove the two open face flowers from the Floral Flourishes bookboard set (save the unused portion of the set for future projects). Apply Piccolo Embossing Powder Adhesive to one side of both of the flowers. Sprinkle Ruby Red Slippers Embossing Powder on the flowers. Use a heat gun to set the embossing powder. Repeat for the other sides of the flowers. Apply a thin coat of G&P Glastique Gloss Finishing Glaze to the front and back of the flowers. Let dry.


Carefully trim the cardstock to the edges of the acrylic bezel with the scissors. Peel off the protective plastic from the front of the bezel. Apply Piccolo Embossing Powder Adhesive to the edges of the front of the bezel. Sprinkle on Shamrock Dreams Embossing Powder on the edges of the bezel. Use a heat gun to set the embossing powder.


Apply one thin coat of G&P UV Resin to the Front of the bezel; spread it out with your finger. Make sure not to put so much resin on the bezel it drops off the edges. Less works best! If you have bubbles in the resin you can remove them by waving a heat gun over the resin to make them pop. Place under UV light (sunlight or nail salon light) for 3 minutes to cure.


Apply a thin layer of Glastique Gloss Finishing Glaze to the Front of the bezel. Place a butterfly sticker on top of the glaze. Let dry. Apply a thin layer of Glastique Gloss Finishing Glaze to the Front of the bezel on the butterfly wings. Use tweezers to grab hold of small amounts of glitter and then slowly opening the tweezers for more controlled application of glitter. Once dry add a coat of G&P Glastique Gloss Finishing Glaze. Let dry. Always seal anything that might be porous with Glastique to prevent air bubbles from forming on surfaces you want to coat with UV resin.


Apply a thin layer of Glastique Gloss Finishing Glaze to the front of the bezel. Sprinkle some Gold glass microbeads on top and let dry.


Apply a second thicker coat of G&P UV Resin to give a nice rounded glass finish, cure under UV light. Apply a thin coat of resin on the back of the bezel to seal and protect your work, cure. Put the Interchangeable Gold Bail on the bezel, attach the two flower piccolos to the bail with two jumprings and string on the Silk Cord Necklace.


Jump on over to my blog Art Resurrected for a Tuscan style card tutorial!


Until next time, safe travels!