Friday, October 31, 2014

The Christmas Story Mini Triptych

Hello, Friends and Happy Halloween to those of you that celebrate it!

Welcome to my last Friday on the Globecraft & Piccolo blog. Seems to be the theme around here, doesn't it? *wink* No worries! There are good things in the works. Stay tuned...

I've had a great time designing with the G&P product line, especially the chunky Embossing Enamel Powders - I LOVE how you can customize the finish by the amount of heat and how long you heat it.

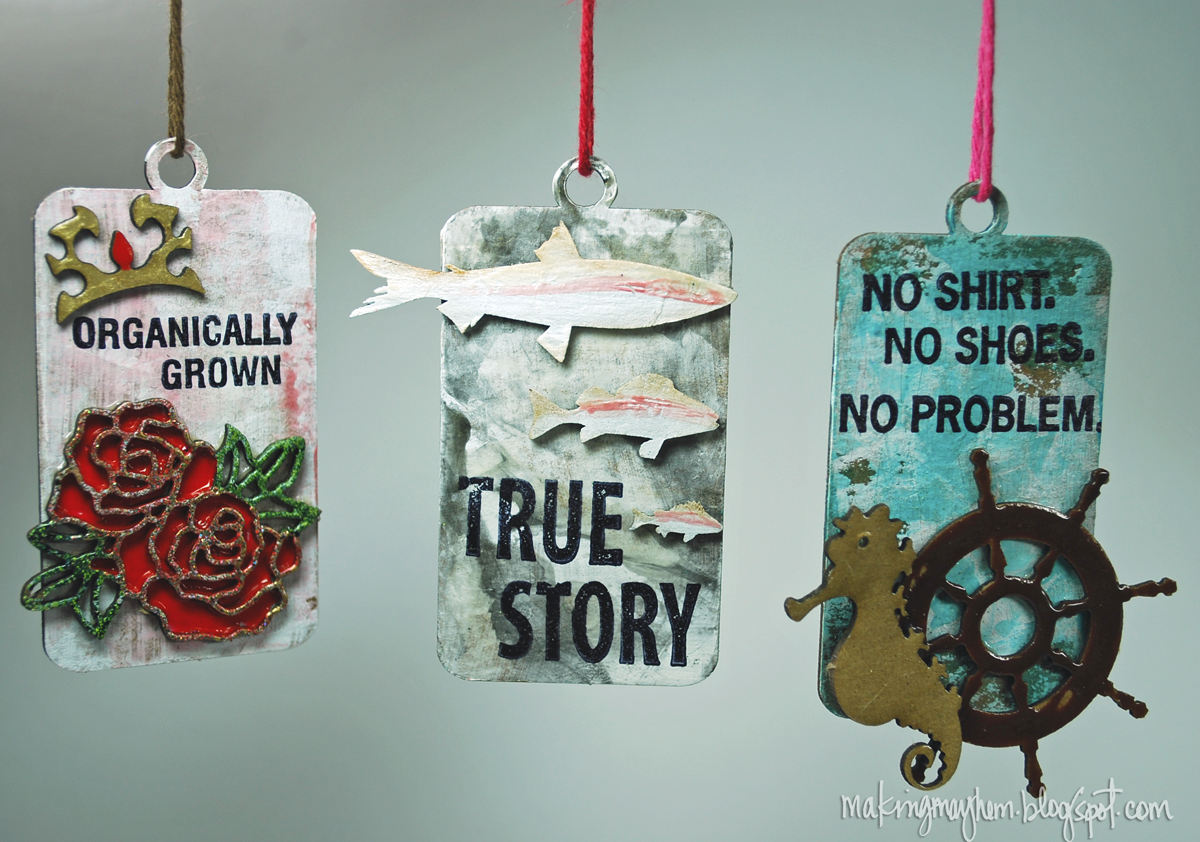
Here the triptych is laid out straight across.

For my farewell project I've revisited my first post where I shared how to create an ombre look with 2 powders. Here I used the powders to create a sky and focus point for the nativity.

All G&P supplies listed at the end of the post.

Begin by coating all the Accents with Mars Black 3D Gels. Set aside to dry.

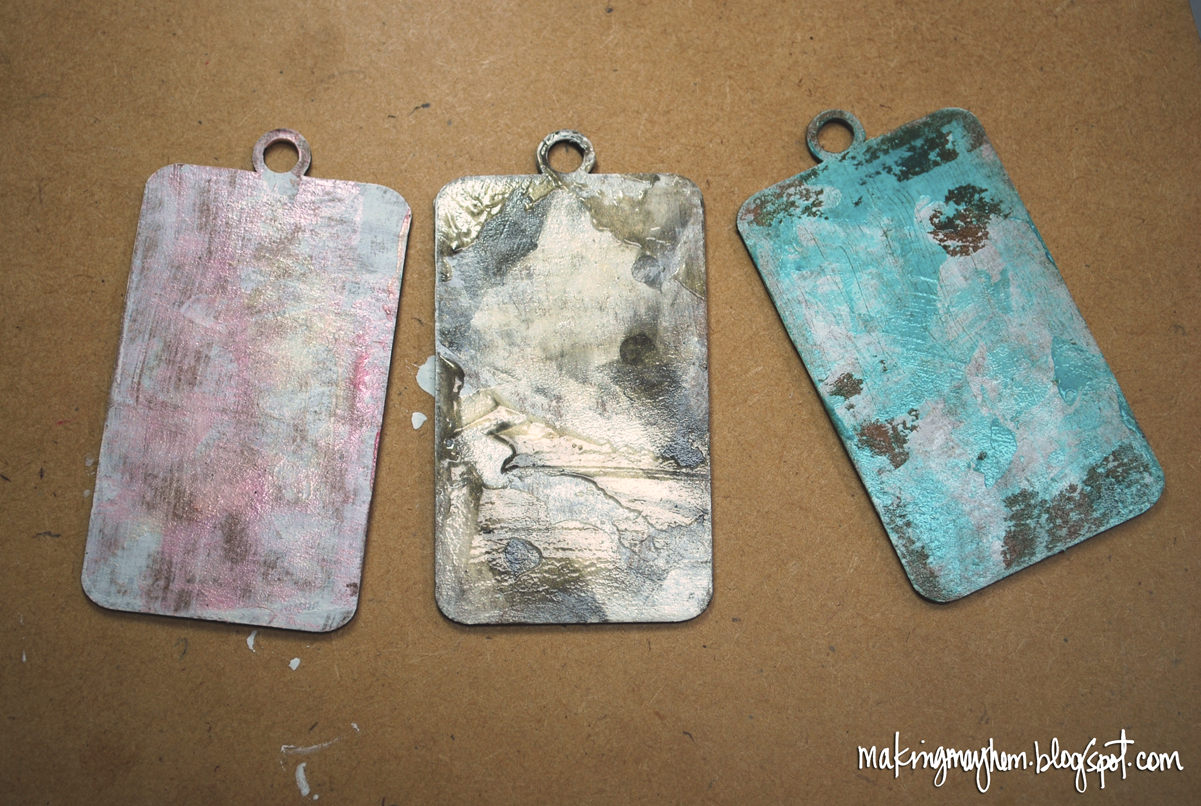
Using rectangle bezels as the base, I gessoed the front and back. Time for the powders! I found that it was easiest to add and heat one powder at a time.

Can you see the sparkle and shine?

Adhere all the Accents to your bases. Adhere a couple of pieces of scrap ribbon to to the back of the bezels and connect all the pieces.

Thanks for stopping by today!


The Christmas Story Accents A121 Rectangle Bezels (pack of 4) B111 Medium Flourishes Accents A139  3D Enamel Gel MARS BLACK Enamel Powder Adhesive Fluid   Enamel Powder AGED WHITE Enamel Powder DEEP BLUE SKY Enamel Powder MICRO WHITE Enamel Powder 24k GOLDGlastique GLOSS Finishing Glaze 2 oz.

Thursday, October 30, 2014

THANK YOU.

This is my last post as a Design Team member for Globecraft and Piccolo. It has been a wonderful experience to work with these products and all the creative people around this product. This however, is not a sad farewell, as I have been asked to join the other designers on the SweetStamps Design Team. SweetStamps is the sister company of GlobeCraft and Piccolo so you will still be seeing lots of these products.

For my farewell design, I have made a cute little note holder. Again a very easy project.


I used the following SweetStamps and Globecraft & Piccolo Products

- Large Stemmed Rose Accent 
- Ruby Red Slippers Embossing Powder
- Mossy Glen Embossing Powder
- Enamel Powder Adhesive
- Framed Fancy Words Clear Stamps
- Micro White Embossing Powder 

Miscellaneous items
- spool
- hairclip (bobby pin)
- Glue (ultimate glue is great)
- chalkboard paint (black acrylic will work just as well)

Paint the spool with the black paint. Set aside to dry.

Emboss both sides of the Rose Shape using the Ruby Red Slippers for the flower head and the Mossy Glen for the leaves and stems.

Stamp the word "thanks" onto the spool and them emboss with the MicroWhite Powder. I left a bit of the loose powder on mine to imitate the chalkboard - just the effect I was after.

Glue the clip to the back of the Rose (I slipped a small piece of plastic into the clip to prevent gluing it closed.)

Glue the rose into the spool.

Leave a loved one a note saying thank you .


There are so many available shapes on the G&P site, you can customize these for any occasion. They would also be beautiful place card holders as well.

Thank you again for visiting me here. Please follow me on over to the SweetStamps blog. Those designers are amazing as well.

Life is Beautiful -- Teresa


Monday, October 27, 2014

A Quickie for the Road


Happy Monday everyone! leslierahye here sharing my last Globecraft and Piccolo post. Yes, you read it correctly, this is my last post here. I LOVE Globecraft and Piccolo products and will continue to "melt" things for years to come! I have enjoyed sharing projects with you and I hope you have enjoyed my inspiration.  With that I leave you a quick project for the winter months--a snowman pendant!

On a chipboard bezel I applied Enamel Powder Adhesive to aid the White Enamel Powder in sticking to the pendant. I built up layers of EP bring it to a bubble sometimes to get the texture in the enamel--to mimic snow. I then adhered the nose and black crystal bling with glastique and added a grosgrain ribbon to the back for a scarf. a simple piece of twine acts as a neck "chain."


Friday, October 24, 2014

Mixed Media Tag Trio

Welcome to the weekend and a Globecraft & Piccolo project! Today I have a trio of tags to share. When you're short on time, but still want to make a little something try a few tags!


Each of these tags were made using the same techniques. Supplies listed below. Using an old credit card or gift card spread a little gesso on the Rectangle Bezels, moving the paint up and down and back and forth with the card. It will leave an uneven layer - exactly what we want!


Using 2 colors of 3D Enamel Gel, add another layer. Spread with the card. Because the 3D Gels are transparent, the gesso layer will show through adding interest to our mixed media tags!


Below is what the Rectangle Bezels look like after they've dried. The 3D Gel colors used left to right:
Rose Pearl + Satin Gold
Mars Black + Satin Gold
Turquoise + Titanium White


I used Embossing Enamel Powders (Ruby Red Slippers and Mossy Glen) on the roses and 'colored' the open spaces (Deep Red) and 'crown' using (Satin Gold) 3D Gel. Wouldn't this make a cute tag for a new baby girl?


I think this tag is my favorite! I love the way the background looks like the river bottom - just perfect for my fish...and it was a 'big one!' The fish are painted using gesso and 3D Enamel Gels (Satin Gold and Rose Pearl).


I love the beach and this tag was fun to put together! These accents are definitely sea worthy, wouldn't you say? The seahorse is coated in Glastique Gloss and the steering wheel in Burnt Umber 3D Gel.


I like these simple, but you can dress the tags up by adding jump rings and beads or even smaller Accents.

Thanks for stopping by today!

Inky hugs,
Angi


Rectangle Bezels (pack of 4) B111 Piccolo LA114 By the Sea Accents Piccolo LA117 Fancy Labels & Roses Accents Fishing Accents LA110Enamel Powder RUBY RED SLIPPERS Enamel Powder MOSSY GLEN 3D Enamel Gel BURNT UMBER 3D Enamel Gel DEEP RED
3D Enamel Gel MARS BLACK 3D Enamel Gel SATIN GOLD 3D Enamel Gel ROSE PEARL 3D Enamel Gel TITANIUM WHITE 3D Enamel Gel TURQUOISE Glastique GLOSS Finishing Glaze 2 oz.Enamel Powder Adhesive Fluid

Thursday, October 23, 2014

Happy Birthday


Good Morning Everyone- turns out that October is full of Birthdays in my family. So I sat down and made a pile of simple cards.

These are quite simple and easy ----

I had these blank cards (by the Paper Studio) - So I used these and added simple embellishments.

I used the following GlobeCraft and Piccolo products.
- Glastique (as the adhesive)
- Embossing Powder Adhesive
- Gilded Rose Gold Embossing Powder 
- ATC sized Frame from a Piccolo Set - (several sets have the frame, I simply bag all of these together as I punch out my shapes)

From SweetStamps I used
- Birthday Elegant Stamp
- Rustic Ink From the Earth Ink Spots Kit
- legless brads from the Chocolate and Marshmallow set 

- ombre toned embroidery floss

Easy. Quick. Beautiful.

Emboss the corners of the frame with the Gilded Rose Gold. Adhere floss to the back side of the frame and tightly and smoothly wrap the frame with the floss. (a dot of glastique is all you need to hold the floss in place. Glue frame to card to accent the area you like. Stamp with a sentiment. I added the Candi Legless Brads to further accent the corner.

Have a wonderful weekend.


Monday, October 20, 2014

The Midway!


Happy Monday everyone! leslierahye here sharing a layout using the midway rides chipboard. My husband and daughter recently attended the State Fair of Texas and took some fabulous photos at the midway that I knew would be perfect with the midway chipboard. I created an 8×8" layout and layered the "rides" along the bottom. Deep Blue and Ruby Red Slippers EP were the perfect powders to coordinate with the red and blue neon of the midway! I hope you enjoy my layout!


Friday, October 17, 2014

Welcome Halloween Bubble Frame

It's time for another project with Globecraft & Piccolo! Today's project is a Halloween themed home decor bubble frame inspired by Mary Howitt's poem The Spider and the Fly.

""Will you walk into my parlor?" said the Spider to the Fly."


This was a quick and easy project to put together! Choose some fun papers and embellishments, including the Fancy Labels & Roses Accents, Bling on a Roll and Oval Bubble Frame Kit. Supply links below.


Cut apart the Fancy Frame. Cover the Bubble Frame with the papers, the Fancy Label circle and Accents with Embossing Enamel Powders, glitter and 3D Gels. The circle behind the skull is a mix of Micro Black Embossing Enamel Powder and Pure Sparkle Silver Glitter.


The skull was a plastic ring. I cut off the ring part and used hot glue to adhere the skull to the circle. Cut 2 of the circles from the Bling on a Roll and glue into the eye sockets.


After embossing the wings, I used hot glue to attach the wings to the back of the circle not the frame.
Love the layers!


The dragonfly was covered in Mars Black 3D Gel and Pure Sparkle Silver Glitter was added before the gel dried.


 I only used 1 layer of Embossing Enamel Powder so that the surface would be textured like old wrought iron. Add a little eyelash yarn for more texture and fun...that's it!

Have some crafty fun this weekend!

Inky hugs,
Angi

Enamel Powder MICRO BLACK Small Traditional Oval Bubble Frame Kit TOSM Piccolo LA117 Fancy Labels & Roses Accents Pure Sparkle SILVER Glitter3D Enamel Gel MARS BLACK Piccolo LA120 Dragonflies Accents Fairy Wings Accents A104 Distress Ink Pad VINTAGE PHOTOEnamel Powder Adhesive Fluid