Showing posts with label Glastique. Show all posts

Monday, October 27, 2014

A Quickie for the Road


Happy Monday everyone! leslierahye here sharing my last Globecraft and Piccolo post. Yes, you read it correctly, this is my last post here. I LOVE Globecraft and Piccolo products and will continue to "melt" things for years to come! I have enjoyed sharing projects with you and I hope you have enjoyed my inspiration.  With that I leave you a quick project for the winter months--a snowman pendant!

On a chipboard bezel I applied Enamel Powder Adhesive to aid the White Enamel Powder in sticking to the pendant. I built up layers of EP bring it to a bubble sometimes to get the texture in the enamel--to mimic snow. I then adhered the nose and black crystal bling with glastique and added a grosgrain ribbon to the back for a scarf. a simple piece of twine acts as a neck "chain."


Wednesday, September 10, 2014

Halloween Tag


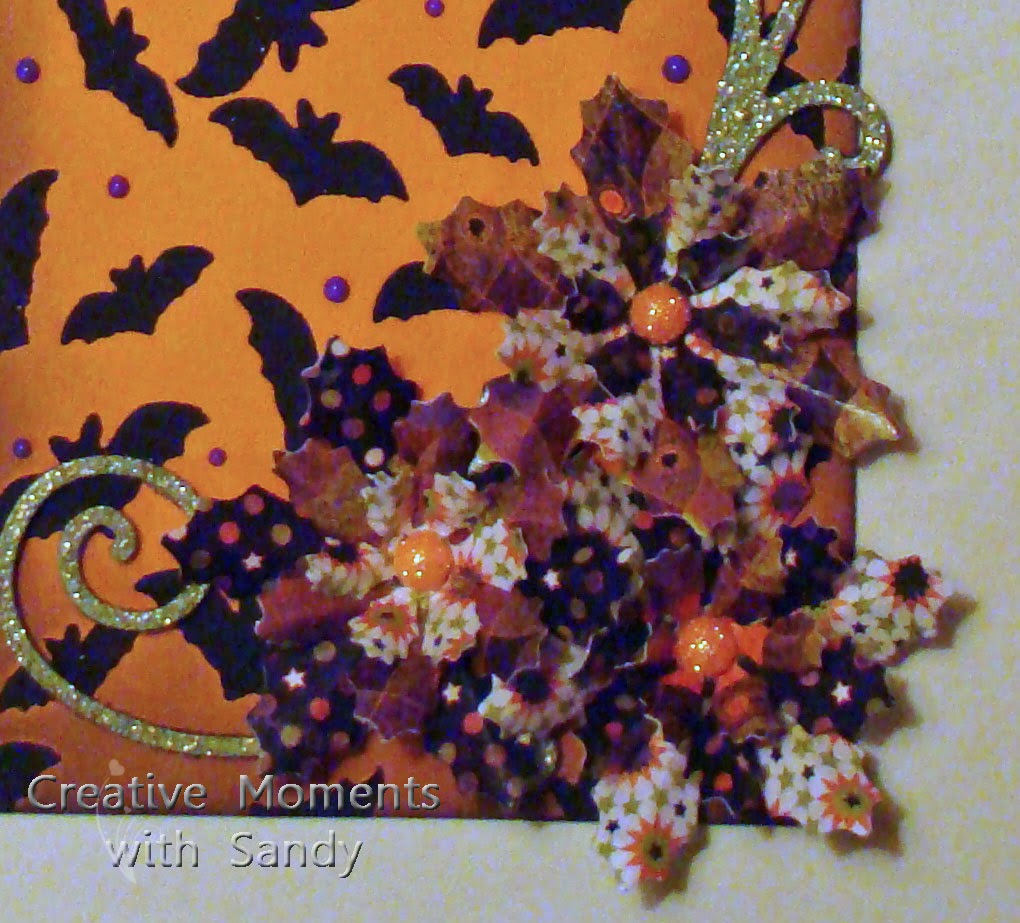
For my project today, I have created a fun Halloween gift tag.  I began with the newly released Sweet Stamps Art Stencil Going Batty and Black Embossing Paste.  This give the bats wonderful raised dimension.  I added some random Piccolo Purple Mist 3D Enamel Gel dots between the bats. 


I love using my Cheery Lynn Designs Poinsettia Strip for Halloween flowers.  I die cut them from 3 papers and then coated each petal with some Glastique.  This gave them a wonderful glossy shine and made them easier to mold.  I used Piccolo Shamrock Dreams Enamel on my Medium Flourish Accents and the Cheery Lynn Designs Happy Halloween.  Adding a spiderweb ribbon finished off the tag.  I hope this inspires you to get your crafty supplies out and create. 

Monday, July 28, 2014

Alice's Wonder-Pendant


  Happy Monday everyone! leslierahye with another jewelry project today! This creation was made using royalty free Alice in Wonderland images and a variety of charms with the Piccolos, Gels and Glastique.
I printed my Alice image to fit the skinny rectangle bezel and adhered it to the background. I heat embossed my keys and steampunk airship accents with Victorian Bronze. I added emboss powders to the edges of the bezel as well. I used glastique to adhere the embossed chipboard to the bezel and then added a layer of glastique over the top of the Alice image.

The charms were colored with 3D Enamel Gels and an additional coat of glastique was added over the top.  Charms and bezel were joined with black jump rings and chains.

  I hope you enjoyed my project! Thank you for stopping by today!

Friday, July 11, 2014

Cock A Doodle Doo Frame

Welcome to the weekend! Today's project is a cute altered frame using the fun Cock A Doodle Doo Accent!


Here's what you'll need from the G&P shop:

Other supplies (linked items will take you to our sister store - SweetStamps.com):
small frame (thrift stores/secondhand shops are great places to find frames!)
paintbrush

Begin by squeezing a small puddle of the Adhesive Fluid. Dip your paintbrush and paint the tail feathers (don't forget to leave space for the other color!) Sprinkle on the Micro Black. Heat and let cool. Repeat using the Ruby Red Slippers for the tail feathers, the comb and wattles.

When cool, use a small sponge or cotton swab to add the red, orange and yellow inks to the rooster.


The fence has 2 layers of embossing enamel. The first layer is Brownstone. Apply it randomly, leaving small open spaces. Heat and let cool. Add the Aged White layer to fill. Use Vintage Photo to ink up the edges of the fence.


Adhere the rooster/fence and other Accents using the Glastique. Coat the small flourishes and flowers using the 3D Gel in Titanium White. Let dry.

That's it! Enjoy your upcycled mixed media frame!

Inky hugs,
Angi

Wednesday, July 9, 2014

Blingy Daisy Ear-bobs


  Happy Wednesday everyone! leslierahye sharing a SUPER easy jewelry project using Piccolo Charms and 3D Enamel Gel and Bling! With the Daisy Teardrop Earrings, I applied Daffodi enamel and Burnt Umber enamel to the flowers and edge of the teardrop. The 3D Enamel acts as a glue when applying individual bling pieces from the Bling on a Roll--cut apart with regular scissors.  Pieces of bling were also applied to the two largest flowers. A generous coat of Glossy Glastique was added to the teardrop charm and left to dry overnight. Jump rings were attached to the charm and French Loops make them simple hanging earrings to wear!

  I hope you enjoyed my project! Thank you for stopping by today!

Wednesday, July 2, 2014

GO Team!


  Happy Wednesday everyone! leslierahye sharing a SUPER easy jewelry project to show your team spirit.This project is created with washers available from your local automotive or hardware stores and 3D Enamel Gel!
I have been absorbed in baseball this spring and summer and so naturally creating a ball-themed necklace to wear on game days was necessary! I used a small washer and layered Titanium White 3D Enamel Gel to make "baseballs". These could have been yellow for softballs, orange for basketballs, white for volleyballs...you get the idea! It took 2 layers to get a nice bubble on the enamel. I let each layer of enamel dry over night. Once dry I wrote with a BIC Mark-it to make the washer look like a baseball. A layer of Glastique over the doodles will help protect the pendant.


The baseball washer could be added to a ribbon. or added to larger washers to make a statement piece. Black ink or enamel can be rubbed into stamped letters to help them stand out. Again, a final coat of Glastique can protect the surface of the pendant.

  I hope you enjoyed my project! Thank you for stopping by today!

Thursday, May 29, 2014

i can imagine.....an empowering wearable message


Good morning friends. Today's fun project is so easy, I almost hesitate to call this a tutorial. I do a LOT of spoon collage pendants - ornaments - charms. The Piccolos from Globecraft are PERFECT for my application. I've stocked up on several to use on some new ones I'm making. Here is the process for completing these.


Shopping list 

3d Enamel Gel in your favorite color combo (I used titanium white, honey mustard, and orange to make these lantana looking flowers. 

Stacey's Stacking Flowers  (i used the tiny ones)

gloss Glastique

spoon or pendant blank

Now here we go.


First color your Flowers with the 3D gel -- and let that dry.


Decide your layout for you collage. Add a dot of Glastique to secure the piccolo in place. Let this dry.


Clip your word or phrase and adhere that using more of the Glastique. Again let it dry


Now - add a layer of the Glastique in and around all of you elements.


The glastique is milky white out of the bottle, but dries to a clear finish.


Once this is dry, add your jewelry findings and a chain --- ready to wear.

Aside  from drying times, this project took me about 10 minutes to complete.

You can add buttons - bits of lace - all kinds of things using this method.

Have a wonderful weekend.


Wednesday, May 28, 2014

Beautiful Butterfly Bauble


  Happy Wednesday everyone! leslierahye here to share with you a a beautiful butterfly necklace. This large butterfly was transformed with targeted embossing. I embossed the edges of the butterfly first with the dark starry sky emboss enamel and then in the center with the GORGEOUS Deep Blue Sky enamel. I have a new favorite. This powder looks teal and then embosses to a gorgeous dark metallic blue...when it mixes with the Stary Sky you get that nifty flecked look. so pretty.
The charms from the butterfly earring set were simply embossed with the Deep Blue sky. The bodies on the butterflies were coated with Matte Finish Glastique. The butterflies were attached to the necklace with black jumprings through the accent holes. 


  I hope you enjoyed my project! Thank you for stopping by today!

Tuesday, April 29, 2014

Adding texture

Morning everyone, Tracy here. 
I wanted to show you today a pendant I have made that is slightly different...
I have used Royal Sterling Embossing Enamel and given 4 thick layers into a Teardrop bezel. Whilst it looked beautiful without me doing anything else i wanted to add some more texture, so whilst the immediately after heating the powder on the last coat I used a script rubber stamp...**PLEASE NOTE** do NOT use any other stamp other than rubber otherwise you risk damaging your stamp...Leave the stamp until the enamel has cooled and then slowly remove....and you then have some beautiful texture. 

 You can just see a hint of blue here, that is because i used some 3D enamel gel in Turquoise  and "buffed" over the surface with it, because the surface was so textured you find the gel sticks in certain areas...it is a lovely effect. I also rubbed some gilding wax in some areas and then finished off with a nice thick layer of Glastique Finishing Glaze  


 This picture shows all the different colours, texture and glaze perfectly. This technique can be used with so many different stamps....and it fun too :) 
Happy crafting 

Wednesday, April 9, 2014

A Penny for your Charms


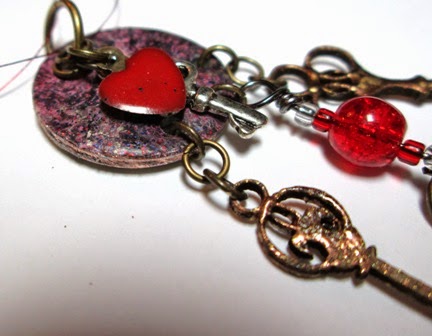
 Happy Wednesday everyone! leslierahye here to share with you a fun pendant I created with an altered penny. I drilled holes into the penny to attach jump rings through. I heat embossed Girls Night Out Emboss Enamel on the penny and then coated with Matte Finish Glastique for a fabulous finish.


I embossed mini keys with my favorite Victorian Bronze. With a brush I added Deep Red enamel to a brass charm. I then dangled a wired beaded charm from the center bottom and the two Piccolo keys. From the top hole I dangle another small key charm and the enameled brass charm!


Wednesday, March 12, 2014

Dragonfly Wings and Spring Things


 Happy Wednesday everyone! leslierahye here to share with you a Spring Dragonfly Card! The Fairy Wing Accents embossed with Victorian Bronze and filled with Glastique are perfect for Dragonfly Wings! The rest of the elements of the card were created with layers of emboss powders and embossed stamping. 
I hope you enjoy my project!


I hope you enjoyed my project! Thank you for stopping by today!

Monday, March 3, 2014

Faux Stained Glass - Take 2


Happy Monday!

Last week I shared with you the Faux Stained Glass card using Enamel Powder Ultra Thick Clear. What I didn't share was my first attempt using the Gloss Glastique! Have you ever had an idea and somehow it didn't quite work out the way you wanted? My first idea with the Faux Stained Glass was to glue the accent to the vellum cardstock and fill in with the 3D Enamel Gels and the Glastique. When it was dried, the vellum had wrinkled and the gel had moved with it. Ugh.


While it wasn't too terrible, I wasn't able to use it on the card...but I did save it and made the tag! So, here's what you need to make one, too:


leftover frame (you can find these in several of the Piccolo Accents
these are items from the Spring Release

Other Supplies:
Distress Stain Vintage Photo
manilla tag
word/sentiment/type stamp
washi tape
seam binding
non-stick craft mat
spray bottle

Start by gluing the accent to the vellum cardstock and filling in with the gel and Glastique. Let dry.

Spritz the mat with water. Dot on the gels (white, gold, turquoise) and add tiny dots of Glastique. Lay the tag on top of the dots and turn the tag while it is still facedown. Lift the tag, reposition and repeat until all the gels have been picked up onto the tag. Let dry.


Once dry, stamp over the tag with a permanent ink and your type stamp. Let dry. (When dry the areas with the gels and Glastique will be non-porous. Notice the sheen and subtle shimmer!)


Trim off the excess vellum. Use the E6000 to adhere all of the pieces to the tag. Trim off the excess frame and save it for another project.


Apply 2 thin, uneven coats of Titanium White to the frame. After it's dry, swipe Vintage Photo over the frame. Let dry.

Color the flourish using the Rose Pearl gel. Attach to the frame using the Glastique. Add bits of matching washi tape. Using your finger, wipe the Rose Pearl gel along the edges of the tag. Make dots of Titanium White 'here and there'.

Tie on the seam binding to finish it off!


It wasn't until after I started this project that I realized that I don't have any of the green gels...but I will be taking care of that this week and will go back and fill in the leaves. The Avocado looks like a pretty spring green! Which gels do you like best?


Thursday, February 27, 2014

My hope is found.....


Good morning peeps --- Teresa here with a tribute to many many people. Meet HOPE. I have known I wanted to make her, and the new Aged Pink Powder gave me the very last item I needed.

She looks a lot more complicated to assemble than she actually is. So let's jump on in. Shopping first.

from the New Release Items.

- Aged Pink Enamel powders
- Aged White Enamel powder

Other Globecraft Piccolo products.
- Cranberry Wine Enamel Powder
- Poodle Skirt Enamel Powder
- Enamel Adhesive
- UV Resin
- Matte Glastique Finishing Glaze
- Snowflake Accents 
- Bejeweled Snowflake Accents


Miscellaneous Supplies
- Cross Stitch Fabric (I used a 32 Count Linen in Ivory)
- Sparkly Floss in pink
- small bit of ivory cardstock
- glitter paper for wings
- silver stamp ink (the London Fog from Sweet Stamps is really pretty)
- a tiny lace medallion for her halo (I made my own.)
- buttons to use as spacers.
- silver sewing thread
- a mounting board
- a tiny bit of gesso
- tiny bit of pink glitter

Now here we go.


I stitched the word HOPE at the center bottom of my fabric using the pink floss. (Link to a free PDF of the font)


I covered all of my Piccolos with a bit of gesso. The sides will show and I carefully made sure to cover them. Wait patiently for this to dry.


Then I embossed all of my shapes in assorted Pinks.


The ones above are Cranberry Wine (this is my current favorite)


The ones above are Poodle Skirt


The top one above is Aged Pink and the smaller one is Aged White.


I stamped my pretty angel's face and then added a bit of the Aged White Powder to her hair. I even used a paintbrush and flecked a little into areas in her hair. I cut her out to fit my medallion.


After embossing her accents - I covered her with UV Resin and set it outside in the sun to cure. In sunshine it takes about 3 minutes. 


I added a medallion behind her pretty face. I made my own to give her a halo effect. I simply glued the resin piece to this.


I cut wings from some glitter paper.  Then (using my finger) smeared the Glastique on them waited just a moment and sprinkled with some pink glitter.

The Glastique is a fabulous adhesive for the glitter. See the detail below. By waiting just a moment before I added the glitter, some of the Glastique dried and the remaining areas held the glitter.


Now all of our components are ready.


I sat down and stitched her bits and pieces to the fabric.


Stacked some, using buttons for spacers. I gasped when I started the stacking. It gave great dimension to the artwork.


After I stitched everything down, I added her face. I simply glued it on with E6000.

Then I wrapped her around an 8x10 board. I have her in a shadow box now - but she could be framed or mounted on canvas.


I love the various ways you can combine the Piccolo shapes.

A similar angel could be made from flowers, from flourishes, even from the various gears.

I do hope you will try your hand at some of these ideas son.