Thursday, July 25, 2013

An artsy wall hanging

It's so much fun to get crafty when you make items to hang on your wall, don't you think?
Hi, I'm Diana and I'm going to show you how I created a beautiful set of wall hangings!


You'll need some Aleen's Glue, Craft frames, and vintage text pages, to start.


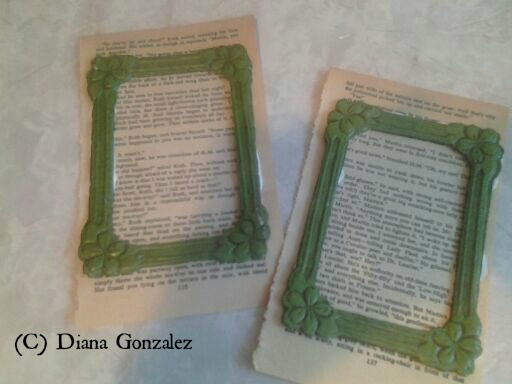
Glue the textbook page onto the back of the frame.


Take two more sheets of textbook paper, and rub a couple of colors of oil pastels onto the page. In layering colors, you'll see how they naturally blend together. Nice, right? Now, spray it with workable fixative, and let it dry.


You can certainly use your own art, but being pressed for time, I opted for a rubber stamp. Use a nice dark color. Let it dry, then cut out the stamped image.


Now you can glue the stamped image onto the middle of your frame. At this point, think of what you want to go around the image. I decided on seed beads and gold sparkle glitter by Globecraft & Piccolo.

Also, I used a little heart shaped bead that I sculpted.
After glueing the beads, I went and used UV Resin, to ensure that they don't go anywhere.


Now, get a sturdy piece of cardstock, and some yarn for hanging, and glue it, sandwiching the yarn in between the cardstock and the frame, and let dry.

You can also use some Glastique finishing glaze around the rest of the piece.
And that's that! Once it's dry, you've got something that looks like this:


You can do a lot with something like this! Even use pictures of your kiddos, if you want.
Happy Crafting! Visit my blog for more ideas: Diana Gonzalez

Tuesday, July 23, 2013

A Turtle Pendant--Metals and Enamel Gels


It's Laura here.  Today, I am sharing a turtle pendant with you.  It features Globecraft 3D Enamel Gels and Instant UV Resin.  Let me explain how it is done.

Materials:
Globecraft Acrylic Tag Bezels
Globecraft 3D Enamel Gels in Ultramarine Blue
Globecraft 3D Enamel Gels in Deep Blue Sky
Globecraft 3D Enamel Gels in Blue Green
Globecraft 3D Enamel Gels in Dark Green
Globecraft 3D Enamel Gels in Avocado
Piccolo Instant UV Resin
Piccolo Easy Grip Tweezers
Manicurist UV Light or Direct Sunlight
Large Round Earring
Metal Turtle Chain Link
Bail
Chain
Sharpie
Wire Cutters
Craft Knife
Sandpaper
Pin
Paper Towel

Directions:


 1)  Remove the earring finding from the hoop.


 2)  Chose the bezel that is at least as large and closest in size to your metal piece.


3)  Use a Sharpie to trace around the metal.


4)  Cut on or just inside the Sharpie line.  You will either need patience (which I have none) or scissors (fortunately, I have these) to remove the excess acrylic.


5)  Rub and rotate the edges of the acrylic on the sandpaper.  You are trying to make the acrylic the same size or slightly smaller than the metal.

6)  Remove the blue plastic, wipe and set aside.


6)  Use the wire cutters to remove the "eye" ends from the turtle.


7)  Squeeze the blue Enamel gels onto the acrylic.  You may wish to make the trails "swirly."


 8)  Use a pin to swirl the colors together.


9)  While the enamel is still wet, place the metal on the acrylic and set aside.


10)  Squeeze the Dark Green Enamel Gel over the turtle.


11)  Use a little paper towel to gently rub off some of the Enamel Gel.


12)  Squeeze some of the Avocado over parts of the turtle and blend a little with the pin.


13)  Use the tweezers to place the turtle onto the project while the blue gel is still wet.


14)  Let dry completely.


15)  Squeeze Instant UV Resin over the project and cure under UV Light or in the sun.

16)  Repeat step 15 a few times, alternating between the front and back of the project until you are satisfied.  I used two coats on each side.


17)  Use the bail to attach the project to the chain and wear!


Thanks for stopping by today.  Come check out my blog at www.rememberinglifesmoments.blogspot.com any time!

Laura Drahozal
Remembering Life's Moments

Sunday, July 21, 2013

A UV Resin tip


Hello, it's Laura and recently, I sent a project to Pat, the owner of Globecraft & Piccolo. I was pretty happy with it.

Then, I got a call from Pat. There was a bow in the project. You can see it here, because I have used the arrow to point out the raised section.


Here is another view:


Anyway, Pat knew immediately what was wrong! I had not applied the UV Resin evenly on both sides. I had only one coat on the back, and two on the front. That caused the resin on the front to pull everything forward? The fix? I can put another layer of resin on the back of the project.

Laura Drahozal
Remembering Life's Moments
So, my tip of the day: ALWAYS coat the resin evenly. Put a layer on one side and then the other until you have as many as you like, but make SURE that you have the same number of coats on both sides.

Friday, July 19, 2013

Tick-Tock pretty and dainty clock


It is Arin here and I have a timely project for you where I pulled out all the stops while using Globecraft and Piccolo's 3-D Enamel Gel and Piccolo Instant UV Resin. Nothing adds to a room than an personal themed clock and this clock just oozes the sweet daintiness of a little girl's love for horses. 


Arin Flynn
A Piece of Life's Pie

Materials Needed:


Step 1: Clock Base - First trace clock base onto the backside of desired designer paper and cut. Using Glastique Matte, apply to both the base and the backside of paper with a foam brush. Align, apply pressure to set and allow to dry. Once dry, ink edges and sand down to distress.  Punch hole through the middle.


Step 2: Apply 3-D Enamel Gel to Embellishments - Using Piccolo 3-D Gel Enamels, apply to wooden and Globlecraft and Piccolo embellishments.  When applying more than one color of 3-D Enamel Gels, allow each color to set and dry before applying a new color for best results. Once all complete, set aside to set and dry.


Step 3: Applying Instant UV Resin to Handcrafted Embellishments - Using a 1 inch circle punch, punch out a circle and add boarder (this boarder is from Samantha Walker Giddy Up scrapbooking Element Sticker Kit).  Apply the Instant UV Resin under artificial light and THEN set in direct sunshine/UV lamp for about 30-90 seconds.  Add sticker and repeat the process of applying and setting the Instant UV Resin.

Stickers can easily be made into a durable and attractive embellishment by securing to a piece of parchment paper and adding Piccolo Instant UV Resin in artificial light and THEN setting in direct sunlight for 30-90 seconds.  Once set and dry, they easily pop off the parchment paper ready to be added to the project. 


Step 4: - Using a Bezel Charm as a Base: - In the need of a solid base for the ribbon embellishment, use the Globecraft and Piccolo Circle Bezel Charm. Add the self adhesive ribbon sticker to the bezel and then tie double bows with crinkle ribbon to the top ring of the bezel.  Apply hot glue to the wooden doily and secure bezel to it.


Step 5: Final Assembly of Clock - With a hot glue gun set at low, add the cloth doily to the center of the clock.  Then begin to attach the wooden doilies with the first layer being secured with hot glue, then the second doily added by securing with Pop Dots for added height.  Then secure the ribbon layered doily with Pop Dots. Add the pre-made resin flower stickers and peal gems. Secure the clock motor and hands and hang!


Making creative and special crafts can be very easy with a little added help of all the stunning and vibrant colors of Globecraft and Piccolo's 3-D Enamel Gels and having Piccolo's Instant UV Resin at your finger tips.  Both products are easy and practical to work with and the possibilities of what you can do with them are endless. Head over to their online store and check out all colors and creative possibilities!  To see more of what I have been cooking up with Globecraft and Piccolo products, pop over to my blog!

Wednesday, July 17, 2013

Lovin' this vintage heart charm


Pin It!
Hello Friends! Heather here with my Fourth post for Globecraft and Piccolo. This month we were challenged to create charms using the new UV Resin and 3D Enamel Gels. I am having way too much fun using these products! You really need to treat yourself to some!


Heather Hudson
My Artistic Adventures
Supplies:

Directions:
Step 1:
Apply a dime size amount of the Wheat 3D Enamel Gel to the heart shaped Bezel. Using a No. 6 or No. 8 flat brush, move the gel around to achieve a textured look; refer to photo below.


Step 2: I inked the whole piece with Ranger's Vintage Photo distress ink. I did a couple coats. 


Step 3: I applied the Piccolo Embossing Powder Adhesive carefully to the edges of the piece, then applied the Ruby Red Slippers embossing powder.


Step 4: I used my Ranger Heat it tool to heat up the Ruby Red Slippers embossing powder. I love the colors of this embossing powder. Gorgeous!


Step 5: I used the Glastique Finishing Glaze to adhere the Juliet Lace to the heart bezel.


Step 6: I used the Fine Tip Applicator and the Wheat Cream 3D Enamel Gel to cover the Cerchio Key Charm. Honestly you need at least TWO of the Fine Tip Applicators. You will love these for applying your enamels...and your glues. Let this air dry for about 5-10 minutes.


Step 7: I applied the Piccolo Instant UV Resin to the top and bottom of my heart bezel, avoiding the lace area. Then set it in my Teresa Collins Stamp maker UV light to cure for 3 minutes.

This stuff is FABULOUS! Go ahead and treat yourself to the large bottle...you deserve it! Honestly if you are anything like me...once you make one, you will want to make a million more :0).

Once I pulled it out, I used the Fine Tip Applicator and the Yellow Ochre 3D Enamel Gel to apply some little dots in the lace work.


Step 8: Next I inked the Cerchio Key with Vintage photo distress ink, then applied my Instant UV Resin and cured it in my Teresa Collins Stamp Maker UV Light for 3 minutes.


Step 9: Next I used the Glastique again to adhere the May Art leaves to the Juliet lace. I attached the Cerchio Key charm to the heart bezel with a vintage bronze O-Ring and used Cotton Candy Baker's Twine to wrap around and top off my Cerchio Key Charm with a bow.


Step 9: I used Glastique to adhere my flat-back rose and vintage bronze bead spacers. Using the Fine Tip Applicator, I added a drop of Satin Pearl White 3D Enamel Gel to create faux pearls to the center of each vintage bronze bead spacers. So now they look like little vintage flowers, reminiscent of an old piece of vintage jewelry. 


I hope you enjoyed my tutorial, and that you decide to treat yourself to a few enamel gels, charms, embossing powders, necklaces and the new Instant UV Resin! I am telling you....YOU WILL HAVE FUN!

If you have any questions, or would like to see some other projects I have created feel free to visit my blog.

Heather