Monday, August 27, 2012

Steampunk'd

Good morning, Steph here with an amazing Grand Oval Bubble Frame. 

Did you know that there are so many ways to use this Grand Oval Bubble Frame?    This frame measures approximately 6" x 7" and easily holds a 4" x 6" photo.  The kit includes the bubble, 3 chipboard frames and a stand.  I love that the chipboard frames come in varying sizes so you can create many different looks with this one kit.

I chose to create a Steampunk'd wall hanging so I did not use the stand in this project.  I think this kit is stunning to use as a wall hanging.


I began by covering the largest oval with pattern paper.  To achieve a metal-type edging, I carefully added Piccolo Enamel Powder Adhesive along the edge, then covered it with Vintage Copper and heat set it.   One of the the smaller layers was coated with Mermaid Tears and  then Temple Stone because I wanted the combination of powers to show.  The smallest layer was coated with Vintage Copper. 


I stamped the Owl once onto brown cardstock and three times onto cream cardstock with Clearsnap Red Barn Chalk Ink.  Using the brown cardstock as the base, I cut out and added a cream owl with foam adhesives.  Then I carefully cut apart the remaining owls and reassembled the owl, adding foam adhesive between the layers for a 3 dimensional look.


I centered the owl on the base and added the bubble and the largest frame on top.  I used office supply clips to hold the pieces in place while they set.   Once set, I added the smaller frames on top, again using the office supply clips to hold the pieces together.  Once the frames were set, I added some Vintage Gears (coated with Temple Stone) around the edges of the frame.


To finish, I punched two holes in the frame and tied the ribbon in the front.  I also added some additional Vintage Gears to the frame.


GlobeCraft Memories Supplies:
Classic Grand Oval Bubble Frame
Piccolo Enamel Powder
Powders:
Copper Kettle
Vintage Copper Mermaid Tears
Temple Stone
Vintage Gears Embellishments
Other Supplies:
Cardstock: Bazzill
Pattern paper: GCD Studios
Ink: Clearsnap Chalk Ink
Ribbon: Martha Stewart


Thanks for stopping by today and don't forget to check and see what the other designers have been creating.


Sunday, August 26, 2012

Book of Spells By Lisa Kettell


Book of Spells
Materials
-1 Little Fancy Oval Bubble Frame's
-Piccolo's: Card Decor Set # 4
-Piccolo's: Card Decor Set #11
-Piccolo's: Key Charm Set
-Powders: Mermaid Tears, 24K Gold, Victorian Bronze
-Glitters: Pure Sparkle Gold
-Glastique Gloss Finishing Glaze
-Glue: Hot Glue, Decoupage Medium, Acid Free Glue Stick
-Mixed Media Inks, Emboss/Pigment Inks, Clearsnap 
-Acrylic Paints: Expresso, White, Black, (gothic colors)
-Air Dry Clay
-Discarded Book
-Chipboard
-Scrapbook Papers, Ephemera, Paper Treat Bags: Lisa Kettell Designs
-Collage Images: Fairytale Follies Collage CD, Lisa Kettell Designs
-Ribbon, Trims, Lace, Fabric Scraps
-Tools: Scissors, Glue Gun, Paint Brushes, Heat Gun, Sand Paper
-Other: Mica Flakes, 3D Embellishments, Dresden Trims, Ephemera/Coin Wrappers, Paper Rosettes, Tiny Bottles, Keys and Charms, Oval Candy Frame Mold


1.  Re-size and print fairy and gothic style images from collage cd, cut, glue to chipboard with glue stick and cut out again. This will give durability to the image, set aside, repeat with images from the scrapbook paper and ephemera.

2. Open one package of the Little Fancy Oval Bubble Frame's, paint the 2 bottom frames with brown acrylic paint, next using an clear emboss ink pad coat the top thin frame in the Little Fancy Rectangle Bubble Frame pack, sprinkle 24K gold emboss powder on it, shake off excess and heat set.

3. Press air dry clay into an oval candy frame mold, remove, let air dry. Once the clay frame is dry, paint with expresso color paint, let dry, then coat with gold ink pad and sprinkle with 24K Gold, Victorian Bronze powders, heat set with heat tool.

4.  Cover a discarded book with plain scrapbook paper using decoupage medium, ad more layers of paper, distress using sand paper, acrylic paint, mixed media paints and ink.
5. Place fancy oval bubble on the mid center of the book cover, trace with a pencil, this will mark your decorating area for the inside of the bubble. Begin Layering your bubble assemblage inside the traced area, using vintage images, ephemera, glitters, powders and other embellishments. Next attach 2 small 1/2 inch wood blocks to the back of the cutout chipboard image of choice using hot glue then attach to the center of book base
 ( See project pictures )


6. Add extra embellishments and layer parts of your assemblage with glastique finishing gloss glaze for an enamel shiny look. Finish off the images with mixed media inks, glitter and mica flakes.

7. Attach the clear plastic bubble over the top of the assemblage you just created followed by the air dry frame made in the candy mold, glue in place. 

8. Begin gluing together pages inside the book to form a ½ inch thickness then cover with sturdy scrapbook paper, repeat until the inside of the book has been covered in scrapbook paper.

9. Start layering your pages with images, piccolos and embellishments, try using some of the left over chipboard bubble frames to surround images inside the book, add party favor bags and trinkets as well.
10. Finally add more inks, powders and glitters to complete the book.


Tips/Tricks
-Use party favor paper bags inside the book to fill with quote, spell or fun print outs, try printing your wording onto parchment paper, then age with mixed media inks.
-Try tearing out all the pages inside the book and just full with scrapbook paper or fabrics.
-Make your book a full bubble assemblage, creating a mini vignette/scene on each page and attaching a bubble frame to each, enclose and enjoy an assemblage on each section inside the book.
I hope this project inspires you to create an altered assemblage book of your own, I bet you'll find a plethora of new ways to incorporate the Globecraft bubbles and frames through the book, I'm already thinking of some new possibilities myself!

Have a magical day,
xoxo
Lisa


Thursday, August 23, 2012

Bringing beauty to the globe

If you haven't heard - I've been published! In a national magazine! It's my first time - can you tell! I wanted to share with you how I created the project that will be in the Sept/Oct issue of Sommerset Studio (on the newsstands Sept. 1).

I subscribe to Design Studio and one day they shared a door wreath made from wrapping birch bark around a straw wreath. I can't explain why, but I suddenly envisioned looking through the Globecraft Memory globe into the forest; like peering out from the inside of a birch tree.

I started by visiting a local field where I took photos of and gathered milk weed pods full of Santa's whiskers. I used one of those photos as the backing for the globe and placed a milk week pod and stem inside the globe as well. It looked very natural - all white and fluffy - in the dimensional globe. To create the look and feel of birch bark I opted to use Grungepaper that I embossed in a script embossing folder. What I like about the Grungepaper is it tears like real birch bark so it really presents itself well. I then gave it a whitewash using Ranger's Snow Cap Adirondack Paint Dabber. The Grungepaper is glued to the Globecraft Memories frame. The brads are attached for show. The edges are torn and curled to represent the real thing.
The nature quotes popped up in a search on Google and were printed and cut out. I inked the edges and attached them to the globe and frame with Glastique, a clear-drying glue. I also added some twigs and branches from the field just to add to that feeling of being out in nature.

The title is set into an Idea-ology Ornate Plate and attached with brads. I really wanted this to be a large visual piece of wall art but wasn't sure how to accomplish that. I had all sorts of visions but nothing would pan out. I finally drove down to the Salvation Army store and I came across an ugly frame for $2. I cut out the center and stapled on some hardware wire and attached the Globecraft frame to the wire. 

After white-washing I added more nature quotes to the inside ledges of the large wooden frame. There's a lot going on in this piece and every time you look you'll find another little piece you missed before.

My mind is always contemplating what I'll put in the next Globecraft Memory Frame! Thanks for stopping by!
Visit me at http://linda-neff.com


Tuesday, August 21, 2012

Jewelry in a Snap - featuring Piccolo Charms

Want to see how to create your very own jewelry using our Piccolo Charms? This video shows the step by step process -- you won't believe how quickly and easily you can create gorgeous,lightweight jewelry with the look of precious metal using our Piccolo Charms line. Check it out here:

Sunday, August 19, 2012

Do You Decorate Your Globe??

Good morning, Pinky here with a fun little project today!

When you grab your beautiful Easel Greetings and Clear Photo Bubbles
do you decorate your bubble? I do!
You can see this fun glittery word I applied to this card. 
Let me share with you how I made this happen!

 Step 1. Cut out Design Adhesive. 
Step 2. Apply Adhesive carefully, press firmly all around, then slowly peel off. 
 Step 3. Using ultra-fine glitter, dust design adhesive.
Step 4. Shake off excess, remove cling glitter using a swiffer duster or any
anti cling dust rag.
Step 5. Coat Little Traditional Oval Frame with adhesive then ultra-fine glitter.
 Step 6. Allow to dry and shake off all excess glitter. 
 Step 7. Coat using Glastique as shown in photo below. 
Allow ample time for drying. 
 Step 8. Cover Easel Greetings card with adhesive then coordinating paper. 
Step 9. Trim off excess. Apply flowers. 
Step 10. Trim off excess paper. 
Step 11. Using strong adhesive, adhere frame and bubble to front of card. 
 You could also punch holes into card base and set jewelry inside

The option are endless.
Next time you grab your globes, remember to decorate them too. 
Until next time.


Products Used: Little Traditional Oval Frame
Easel Greetings
Glastique
Clearsnap Glitter & Design Adhesive
Prima Flower
Momenta Paper

Saturday, August 18, 2012

Entreaty Passage Box

Even as a child, I was a collector.  For years, I have held onto items like rocks, feathers, old keys, anything that holds a strong memory or reminds me of a personal goal. I was not sure what to do with all of the sentimental items that I have held onto for years.            
I decided to make a box which would hold all of those memories and goal requests. The project began with photo box book I found at a local craft store on cleareance.  Today, I am sharing how this box came together using Piccolo Enamel embossing Powders.

Detail

Detail

GlobeCraft Memories Products
Piccolo Brownstone Enamel Powder
Piccolo Fine Black Enamel Powder
Piccolo Victorian Brass Metallic Powder
Glastique
Piccolo Enamle Adhesive
Piccolo Heart Charm-Card Decor and More

Other Products
Live Inspired Stamp-Close to My Heart
Top Boss Watermark Embossing Ink Stamp
Inkadinkado Feather Stamp
Prima Black Coal Ink Stamp
Prima Rusty Bucket Ink Stamp
ColorBox Molding Mat-Gameboard
Prima Paper Stack

Here is the video to share how I created this box.


                           Thanks for Stopping by the GlobeCraftMemories Blog

Tuesday, August 14, 2012

Santa's List Ornament

Good morning, Steph here with another GCM Ornament.  This time I used the Santa's List Ornament.  Since these ornaments are in pieces, it's so easy to decorate them just the way you want!

I first used Mossy Glen on the outer rings.  This is such a pretty color and perfect for Christmas themed projects.  Then, along the very edges of the rings I used Copper Kettle.  Holding the Adhesive at an angle, I was able to add Copper Kettle exactly where I wanted it.  This additional color added a nice pop of color to the globe.

On Santa, I used Girls Night Out.  I wanted some deep color, so I coated Santa in 3 layers, heat setting between each layer.  To create the overall look of Santa I created a mask of Santa, then cut out the areas where I wanted to add another color.  I placed the mask on Santa, added some Piccolo Adhesive, then added Pure Silver Sparkle on the top of Santa's boots, the bottom of Santa's cloak and the edge of Santa's hat.  The mask helped keep the Silver in just the areas I wanted it to be.

Lastly, I coated Santa's List with Mermaid Tears.


After assembling, I finished off the globe by added Pointsettias and leaves in the corner and a large sheer ribbon at the top.

Thanks for stopping by today. 


Saturday, August 11, 2012

Join us at Heirloom NOVI!


We're in Novi. MI all day today at the Heirloom Stamp Show!! 


We'll be here from 10am to 4pm demoing, crafting, and sharing all things Globecraft Memories with you. Stop by our booth to see all of our new product in person, including our new Cool Embossing product and our new Ornaments! Check out a demo Globecraft Memories creator and founder Pat Secrist -- see you there!

Friday, August 10, 2012

His Teddy

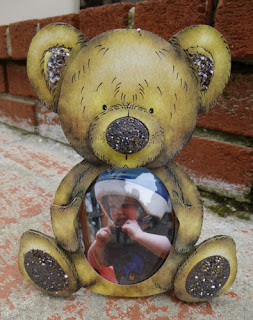
There is nothing better than a teddy bear to bring a smile to your face.  Kids love them.  Adults love them.  Globecraft Memories has this fabulous Teddy Bear Bubble Frame and I was thrilled to work with it today.  It's a little different from the other globes in that everything is prepared for you from the color to the individual pieces that create the dimension.  All you do is put it together.


The package contains 3 sheets of perforated die cut teddy bear pieces, the globe and the adhesive squares.

You simply seperate the pieces.  Now the fun begins!


Using the "whole" Teddy Bear as the base, insert the stand in the back and cut a photo to fit within the confines of its tummy.  Glue the photo in place and glue the bubble on top of the photo, then just hold it in place until it dries.


Those white squares are where you now place the foam adhesives.  There is NO guess work on how to assemble Teddy.  Since the foam adhesives are black, they naturally blend in with Teddy's colors.


 Continue to add the layers and the foam adhesives until Teddy is complete.


Look how fun the foam adhesive makes Teddy look.  It's a perfect 3 dimentional Teddy that can be placed on any shelf in the house, even the mantle.

Teddy is completed, but I wanted to add just a little something else.  I added some Temple Stone to his paws, his nose and inside his ears.  It really adds a nice finished look.  Don't you love the added effect these powders give Teddy!


While I put a photo of my son in the globe, you could also put in baby memorabilia, a lock of hair, the first lost tooth, etc.  The possibility are endless, so have fun creating Teddy and don't forget to check out the store for other varieties of frames to work with.

Thanks for stopping by today.