Hi, it's Candy and I'm back with another Globecraft & Piccolo tutorial.
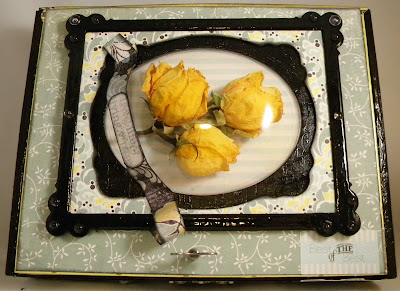
I am so excited to share this altered cigar box with you.
 |
| Candy Spiegel Candy Scraps |
- Classic Fancy Rectangle Globeframe Set
- Glastique Matte
- Glastique Gloss
- Mars Black 3D Enamel Gel
- Dried Roses
- Cigar Box
- Paper by Authentique
- Ribbon
- Metal embellishments from Tim Holtz
- Dew Drops from Robin's Nest
- Black Soot Distress Ink
- Black Paint
Sometimes when I start working on a project, I know what it will look like when it is done. But this time, I started with the idea that I could put dried roses in a globe and then the project sort of grew from there. It was a rather organic journey.
The first thing I did was get out the Classic Fancy Rectangle Globeframe set. I had started working with the frame some time ago and then apparently changed my mind. Two of the frames were already painted black. I had just purchased papers and embellishments from Authentique's newest line and they were laying on my desk. As I gathered the frames and flowers and saw them laying with the paper, I knew it was meant to be!
First, I covered the back of the frame with striped paper. Then, I traced the elegant frame onto another printed sheet of paper. I carefully cut it out so my line was no longer visible and attached it to the frame with Glastique Matte.
After it dried, I took Black Soot Distress Ink and went all the way around the edges, inside and out. This covers up any places where the paper didn't cover and gives it a little extra pop.
I covered the smallest frame that had been painted black in Glastique Gloss. The larger mat, I put a bit of Glastique on and then used a dry paintbrush to drag it around. This created a unique texture to the surface and made it not quite as shiny.
I placed the flowers inside the globe and applied Glastique Matte to frame and used binder clips to hold it in place until it dried. I repeated this process with each of the frames, using the nails that come with it to line them up.
Then I grabbed a cigar box from my stash and painted the edge of box with Mars Black 3D Enamel Gel and then covered the inside with paper.
I continued to cover the outside of the box in paper ...
And then glued the globeframe to the lid.
I cut a strip of paper, inked the edges and then coated it in Glastique Gloss. (I used my finger to spread it around). I let it dry for a few minutes and then used a pencil to roll the edges. Then I let it dry completely.
I attached it to the top of the globe, applying Glastique Matte to the edges and middle to hold it in place. The Glastique makes it strong and flexible, like soft plastic. I also added Dew Drops around the edges and a metal handle to help lift open the box. I also added a bit of ribbon, Dew Drops, puzzle pieces and a keyhole to the sides of the box.
What do you think?
Visit my blog at candyspiegel.wordpress.com for another idea using products from Globecraft & Piccolo.


7 comments:
Very pretty cigar box! Great idea putting those flowers in the globe.
I think it is beautiful!
Gorgeous gorgeous - do you think you can take a picture from the top. I would love to see topside view too.... Simply to pretty not to.
okay i am nuts I had to click the link just ignore me.
Candy this is soo cool and I love the idea of putting the flowers in the globe!
Lovely piece Candy! The dried flowers look perfect. :)
Wow! I love how this box turned out! Absolutely gorgeous!
Post a Comment