Saturday, June 29, 2013

Cheshire-inspired journal page


Hello! Tracy here with another tutorial! I wanted to continue with the Globecraft and Piccolo June Design Team Challenge to create a background layout using G&P products but I decided to turn it into one of my art journal pages! The art journal pages I have been creating lately contain little snips of stories or themes that inspire me. The Cheshire cat from Alice in Wonderland is a favorite of mine and I have always seen the cat as philosophical in nature, a perfect subject for a journal page!  


Tracy Alden
Art Resurrected

 Supplies:
Bookboard Fashion Cat Earrings
Bookboard Fashion Cat Charm Set
Piccolo Enamel/Embossing Powder Adhesive
Micro Black Embossing Powder
24K Gold Embossing Powder
Cranberry Wine Embossing Powder
Mardi Gras Embossing Powder
Pink Rose 3D Enamel Gel
Purple Mist 3D Enamel Gel
Mars Black 3D Enamel Gel Piccolo Easy Grip Tweezers
Glastique Matte Finishing Glaze
Heat Gun
Floral, vines and boarder stamps
Black ink
Sticker Gems and sticker gem swirl patterns
Cardstock
Cosmetic sponge
Pigma Micron Ink Pen


I inked my chosen floral and vine stamps with Piccolo Embossing Powder Adhesive and stamped around the edges of the the cardstock. I used different edges of the stamps to give a varied look to the stamped images. I wanted to get the look of growing plant life. I then sprinkled on the Piccolo 24K Gold Embossing Powder and heat to set.


Carefully I separated the two cat Piccolo Bookboard sets from their backing. Using the backing as a stencil I cut out pieces of card stock in the shapes of the cats. These will become the backing for the cat Piccolos.


I cut the front flap off of a precut card and wrote Cheshire in ink. I then used a blotting motion to apply G&P Pink Rose and Purple Mist 3D Enamel Gel to the card stock with a cosmetic sponge. I repeated the same blotting application to a printed out snippet of text from the Alice in Wonderland book.


I applied Piccolo Embossing Adhesive to the front of the two large cat, mini cat, cat face and the inner swirl Piccolos the pieces. I coated all of the cat pieces with Micro Black, the swirls with 24K Gold and the cardstock cat shape cutout with Cranberry Wine Embossing powders and heat to set.


I glued the cat Piccolos to the now embossed cardstock with
Glastique Matte Finishing Glaze.


Carefully I glued the Piccolo cats, swirls and sponged cardstock in place with Glastique Matte Finishing Glaze.


Using the Glastique Matte Finishing Glaze I applied little sticker gems to the cat Piccolo eyes and pink sticker gem swirls to the page.


Using the ink pen I put in little swirls and doodles around the edges of the cardstock and between the stamped embossed flowers.


Now it is ready to be placed into my art journal! :)


Jump on over to my blog Art Resurrected for the inspiration for this post and for more craft tutorials!

Until next time, safe travels! 


Thursday, June 27, 2013

Tip: Enhancing your papers


Hi, it's Candy and I have a new tip for you today ...

Did you know you can use Instant UV Resin and Glastique Gloss to add dimensional shine to your paper?

It is extremely easy ... you just select the area you want to be raised and shiny and apply the product of your choice directly from the bottle. If you use Glastique Gloss, you will need to set it aside to dry.

Candy Spiegel
Candy Scraps
If you use Instant UV Resin, you will need to sit it in a sunny window or under a UV lamp for 3 minutes to let it cure.

The UV Resin will provide a slightly higher and glossier image than the Glastique, as you can tell from the photo above.

You will notice that the area with just UV Resin appears darker than the rest of the eggs on this paper. Apparently, when you apply UV Resin to a porous surface, like paper, it soaks in a bit as it cures. It actually makes the paper transparent (as you can see from the photo below when I held it in front of the window) ... so whatever is underneath, in this case my desk, alters the color of the paper.


That may be a really cool technique for some projects, but for this one I wanted to keep the eggs the color they were. So, applied a very light coat of Glastique Gloss with my finger and let it dry. This only takes a minute because the Glastique was so thin. Then I coated it with the UV Resin for the perfect little chicken eggs.


Tuesday, June 25, 2013

Embossing Powder Stones

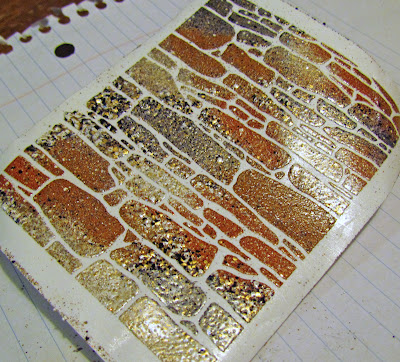
Hello, it is Laura here with another way to use Globecraft Embossing Powders to create some background (haha) elements for your scrapbooking pages.  I love the color choices available.  The technique I used today is one I learned over at Dreamweaver Stencils, where they call it the Double Glitter Technique.....but, no glitter used here today.  Let me explain....


Materials:
Piccolo Embossing Powder in Real Rust
Piccolo Embossing Powder in Temple Stone
Piccolo Embossing Powder in Brownstone
Piccolo Embossing Powder in Mermaid Tears
Crafting Heat Gun
Piccolo Embossing Powder in Micro Black
Piccolo Embossing Powder in Cranberry Wine
Piccolo Embossing Powder in Girls' Night Out
Piccolo Embossing Powder in Siam Silver
Piccolo Embossing Powder in Vintage Silver
Piccolo Enamel/Embossing Powder Adhesive
Piccolo Easy Grip Tweezers
Dreamweaver Stencil LG 611 Stone Wall
Dreamweaver Stencil LL 394 Feathers
Dreamweaver Double Stick Mounting Paper
Handmade Hawaiian Soap (from Dreamweaver) or some other natural, soft, bar soap
Large Stencil Brush
Small Paint Brush
Paper House Papers from the Country Stack
Scotch Adhesive Tape
Art Glitter Designer Dries Clear Adhesive
Die Cut Cardstock Letters (I used the old Quickutz Chandelier Letters)
Non Stick Craft Sheet

Directions:
1)  Rub the bar of soap on the back of the Stone Wall stencil.  It will create a cloudy sheen over the metal, as seen in the picture below.
2)  Notice the little bits of soap that are left behind on the stencil.
Use the stencil brush to carefully brush off these soap bits.
3)  Remove the backing from one side of the Double Sided Mounting Paper by "snapping" it open.
4)  Place the metal on the exposed adhesive surface SOAP SIDE DOWN.
5)  Pour the embossing powder over the sections that you would like to be that color.  You do not need to use a lot.  I used Real Rust, Temple Stone, Mermaid Tear, and Brownstone.

6)  Press lightly with your fingers and blend powders into any areas that need additional coverage.


7)  Flip the project over and carefully peel the adhesive paper off of the stencil.  Be sure to leave the stencil flat on a hard surface as you remove the paper.
8)  Use heat gun to emboss the powders.

9)  After the embossing powder cools, pour Micro Black over the project and rub in with your finger.

10)  Use the stencil brush to brush off any excess powder.  This is also a great way to distress the black a little if you brush aggressively.
11)  Heat set. 
12)  Repeat steps 1-11, as you will need two to create a frame.

13)  The technique for the feathers is almost identical to steps on through 11.  The powders used are Siam Silver, Cranberry Wine (on the edges of the feathers) Girls' Night Out and Micro Black.  The pinks are placed into position by using the outer one (light pink) first and pushing into place.
14)  Before adding the Miro Black, be sure to trim off most of the extra (rough cut) with scissors.  This will save you some of the powders.

15)  Heat set and trim closer to the image.
16)  For the letters, simply apply the Embossing Adhesive directly with the dauber on the bottle.
17)  Cover with the Vintage Silver Embossing Enamel.
18)  Heat set on craft sheet.  Use the tweezers to hold the card stock steady as you heat.
18)  Repeat steps 15-17, so that you have two layers of embossing powder.
19)  To apply the letters, use Designer Dries Clear Glue.
20)  Create the silver edge by using a paint brush to apply the Embossing/Enamel Adhesive, cover with silver and heat set.
21)  To create the frame, first cut the size you want the frame to be and adhere the picture inside.
22)  Cutting around the "stones" whenever possible, cut the images to fit your photograph.  Save the extra to use around the page.
23)  Remove the backing paper and adhere to the photo and mat.
24)  Trim around the outside of the frame, making a "rocky" edge if possible.

Here is another look at the finished product.

That about covers it! Thanks for checking out my post.  If you want to come visit me, my blog is www.rememberlifesmoments.com.  I would love to see you there!


Friday, June 21, 2013

Simplify with Piccolo Embossing Powder


Hello, it's Arin here and I have to say Globecraft & Piccolo Embossing Powders have breathed new life in my interest in scrapbooking!  

Yes, I have admitted that I am not a fan of scrapping, but being able to add layers of interest and depth without a whole lot of embellishments and pre-planning the layout, is right up my alley! 

I challenged myself to do a real layout with only using what I had in my supply stash and the Piccolo Embossing Powder. I feel I have myself a layout that looks interesting and tells a story that was quick and easy to throw together, yet the high quality of the Piccolo Embossing Powder really carries this beyond the simplicity of this layout! 

Materials Needed:
Arin Flynn
A Piece of Life's Pie
  • Globecraft & Piccolo Embossing Powder Adhesive
  • Globecraft & Piccolo Micro White Embossing Powder
  • Globecraft & Piccolo Bahama Aqua Embossing Powder
  • Globecraft & Piccolo Siam Silver Embossing Powder
  • Globecraft & Piccolo Poodle Skirt Embossing Powder
  • Globecraft & Piccolo - Royal Sterling Embossing Powder
  • Recollections Washi Tape
  • Lawn Fawn Clear Stamps - Critters Ever After
  • Clear acrylic stamp block
  • Die Cuts with A View - All About Girls 4.5x6.5 cardstock
  • Crate Paper- Little Bo Peep 12x12 sheet
  • Dauber
  • Close to My Heart Stamp Ink - Cotton Candy (for the inking on cardstock)
  • Scotch ATG
  • Heat Gun
  • Silhouette Cameo
  • Color Pinter
  • Recollection white cardstock
  •  
Step One: Embossing Printed Pictures - Once pictures are printed out on a color printer and hand cut or cut with a Silhouette Cameo (smooth white cardstock was used), apply Piccolo Embossing Adhesive around the border of each picture and dust with Piccolo Embossing Powder.  Remove excess and set with heat gun.


Step Two: Embossing edges of cardstock layer - Applying the same method above, apply Piccolo Embossing Adhesive around the border of and dust with Piccolo Embossing Powder.  Remove excess and set with heat gun. This provides a great framing element to each of the pictures. 


Step Three: Embossing with stamp images - Applying Piccolo Embossing Adhesive to clear stamps, stamp onto desired surface and dust with Piccolo Embossing Powder. Remove excess and set with heat gun.  This was done onto the base of the layout at well as an inked edge scrap piece of paper for the sentiment. 


Step Four: Assembly and adding final touches - All layers were attached to the base of the layout with ATG and washi tape was added for a final touch. 


Creating keepsake layouts can be overwhelming at times when you feel like you have to add all but the kitchen sink to make them feel unique and personal.  Using the magic of Piccolo Embossing Powder and a few quick and simple techniques, you can succeed in creating special layouts without a whole lot of fuss! 

To see all the fun I have been having with Globecraft & Piccolo products, head over to my blog