Monday, December 9, 2013

More Snowflakes and Instant UV Resin


This weekend I was up at the open house hosted by the Globecraft & Piccolo parent company, Sweet Stamps.  This is one of the make and takes we created.  A beautiful winter card showcasing Piccolo Siam Silver embossing powder and Snowflakes.  We used Blue Sky 3D Enamel Gel for the accents on the snowflakes.  For the sparkly edge around the white panel, we applied a thin bead of Glastique and then some Pure Sparkle Silver Glitter.  There are 3 sizes of glitter in this mix which gives it fabulous shine.
Sweet Stamps products used:
I also got a chance to play with Piccolo Instant UV Resin.  I started with a thin rectangle acrylic piece (coming to the store soon).  I stamped snowflakes with white Staz-On then coated the piece with UV Resin.  Three minutes under the UV light and I was ready for layer two.  I added two Holly Clusters that I colored with Smooch ink, coating with another layer of UV Resin.  Three minutes later, I stamped more white snowflakes and added the final layer of UV Resin.  I added a layer of Light Blue 3D stamp paint to the back of the acrylic (love the glittery shine), then sealed it with a layer of Glastique.  Each layer can be seen as you look into the piece, it has so much depth.  I am going to use it as a zipper pull! 
Sweet Stamps products used:

Friday, December 6, 2013

Welcome our new Design Team

Globecraft Piccolo Design Team

Angela Crandall
Mistress of Mayhem, Domestic Goddess in Training, Maker of Lists & Stuff, Angi - that's me! I have been blessed to be the wife of a hottie for over 20 years, mom to 4 'keep me on my toes' extraordinary people (+2 fur babies), artist in residence in our crazy, but happy home. I love texture and layers, color, upcycling and most of all experimenting with new techniques and product. When I'm not busy getting my art on in the studio, I'm hanging out with my family, baking in the kitchen (in an altered apron, of course!) or enjoying the beach. I am ridiculously excited to be designing for Globecraft & Piccolo!


Leslierahye Strickland
Wife of 21 years to my soul mate. Mother to two amazing free-willed beings--son Will, 13, and daughter Samantha, 7. Daughter of devoted, loving parents. I've been crafting and creating since before I can remember, dabbling in everything from sewing, to oil painting, to scrapbooking, to photography to beadwork to crafty crafts--and many things in between. I've gifted my work. I've sold my work. I've used my work.  I love to share projects and techniques with crafters of all skills. I continue to explore in creativity to keep myself fresh. I love mixed media and upcycled crafting. I love making my own embellishments to coordinate with my projects.  I am thrilled to be a part of the Globecraft Piccolo Design Team! I can remember 20 years ago making my holiday cards with silver embossing powder and a candle--I had purchased it at the Hallmark store--you could get gold or silver. A few years later I was introduced to the modern style of stamping including artsy stamping with ultra thick enamels! I was in love! Creating for Globecraft Piccolo is a dream job as I will be enjoying my favorite powders and enamels and incorporating the fantastic chipboard pieces into the mix! I can't wait to share with you all and hopefully inspire you along the way!


Sandy Hulsart
I am thrilled to be working with Stacey of Sweet Stamps and the Globecraft & Piccolo team.  I will be heading up the team and I think we will have great things in store for you.  I have been a crafter of some sort all my life but did not start stamping/card making until the summer of 2005. I met Stacey at her store here in town and the rest is history


Teresa Atkinson
I'm Teresa Atkinson (aka MaggieGraceCreates) and I am so excited to be working with Globecraft and Piccolo as well as the other talented ladies on this team. I am a woman of that certain midlife area of age with two beautiful adult daughters, one very spoiled dog, and one seriously crazy cat. I learned to crochet as a child by watching my Grandmother and have always been involved in some kind of creative project. Because "stash building and resourceful use of items" is a specialty, I was always the Mom in charge of the school projects for all of my girls' friends. I consider myself a mixed media artist with a strong focus in upcycled materials. My style is a little on the shabby side but not over the top feminine. I ADORE paper crafting and jewelry crafting. And I love how the G&P products can be used for more than just card making. I love to try unusual applications of materials and I sure hope that I can inspire people, much as I have been inspired by seeing other designers.

Monday, December 2, 2013

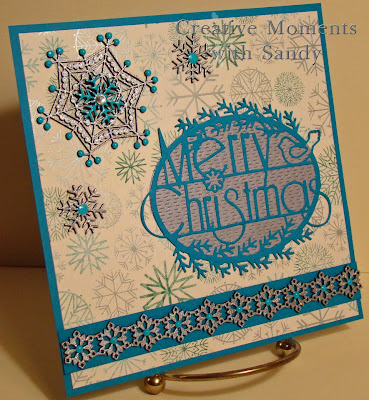
Piccolo Bejewled Snowflake Accents


Today I wanted to share a card I made using Bejeweled Snowflake Accents from Globecraft & Piccolo coupled with Cheery Lynn Designs dies.  I added Siam Silver embossing powder to each of the snowflake pieces except the small one in the center of the larger snowflake.  I coated that one with Cobalt Turquoise 3D Enamel Gel and added additional gel accents to the rest of the snowflakes.  Be sure to click on the pics a  closer view of the embossing powder shimmer.


To create the backing on my Cheery Lynn Designs Merry Christmas sentiment, I used one of the dies from the Little Stackers Oval Nesting Dies.  It matches perfectly.  I used my Large Parallel Rectangle Stitcher plate to add some texture to the oval before mounting the sentiment.  Finished size is 6" square.

Thank you to everyone who showed interest in our DT call.  We will be looking at applicants and making our choice in the next few days.

Thursday, October 31, 2013

Globecraft Piccolo Design Team Call

Globecraft Piccolo is holding a Design Team call. We are looking for enthusiastic crafters who like to work with Embossing Enamel Powders, 3D Enamel Gels, Instant UV Resin and Chipboard. We would like to showcase our products as mixed-media, altered art, card making, home decor, jewelry and so much more.  

Term length: 6 months {January through June, 2014}

Design Team Benefits:
  • You will receive 3 full size Embossing Enamels and 6 sample sizes.
  • You will receive a bottle of Enamel Embossing Adhesive
  • You will receive 4 bottles of 3D Enamel Gel
  • You will receive your choice of 1 oz. Glastique Finishing Glaze or  .5 oz Instant UV Resin
  • You will receive an assortment of Acrylic Charms and Bezels
  • You will receive $40 store credit towards purchasing chipboard shapes
  • During months when there is no new release, you will receive a $30 store credit towards product.
  • You will receive a 30% discount on purchases from our store.
Team Member Requirements:
  • You must create a project weekly, posting both to your personal blog and to the Design Team blog.  Use as many of our products on each project as you can with detailed steps of completion.
  • Any product you receive as a DT member must be used at least once during your term as a DT member.
  • All projects you post on the Globecraft Piccolo blog must be mailed to us for use in our booth at trade shows. You will be reimbursed for shipping in store credit.
  • You must participate in all blog hops, joint company ventures and new release posts.
If you are interested in joining this fun and exciting new team, please create a project showcasing your style. Link your blog post to the InLinkz found at the end of this post. Please only one entry per person, we will check out the rest of your blog when we visit. We hope you will consider joining us on this crafting adventure!

The Design Team call will end on November 24, 2013. We will review the entries and contact the new members after November 26, 2013. 

Monday, September 30, 2013

Haunted House Card


I got out my new embossing powders and book board cut outs from Globecraft Piccolo.  I love their embossing powders, they are such a wonderful mix of blended colors.  I started with this adorable House Haunting Ornament.  I trimmed off the hanger on the top to just make it a frame.  I embossed the base with Vintage Black embossing powder.  I added a bit of Turquoise Lagoon embossing powder to the moon in the sky and to the base of the house. Next I glued the plastic dome down on the frame.  Using Starry Sky embossing powder, I covered the second frame which I then glued over the edge of the dome.  It is really hard to get a good pic of the beauty of the embossing powders and the frame.  I added a couple of Happy Pumpkin Accents, which I covered with Orange 3D Enamel Gel for a lovely shiny effect.  I did the same thing with the bats from the Halloween House Haunting Accents by adding Mars Black 3D Enamel Gel.


Now for my card construction, I started with a 5.75 inch square purple base.  I added a piece of patterned paper from the WeRMemory Keepers Spookville 6x6 paper pad.  Next I added a Cheery Lynn Designs Spider Web Mesh border and Ornamental Gate.    And that was about it!  Thanks for stopping by. 

Friday, September 27, 2013

Steampunk Gears Tag

I created a tag and embellished it with Globecraft Piccolo embossed book board and Cheery Lynn Designs flowers.  I started with this great Steampunk Gears Necklace and Vintage Gears set.  I embossed all the book board with Vintage Copper embossing enamel.  I love that this has a blue green patina base to it; just like copper that has been out in the weather too long.  You can get quite a few different aged looks by varying the amount of heat you apply or by adding additional layers of enamel.  I think this is my favorite of the enamels.  The key is also embossed with the same Vintage Copper.  Don't you just love the aged look?

I used the necklace bezel as a platform for the largest of the Cheery Lynn Designs Poinsettia Strip flowers.  I used two large, one medium and one small petal to make that flower.  I added some Vintage Photo Distress ink to the petals before creasing them upwards.  I added two small flowers created with one medium and one small petal and then another large flower but this one only has one large, one medium and one small petal.  To give the tag some interest, I embossed it with my Cheery Lynn Designs Do It Yourself embossing plate, adding some Vintage Photo distress ink to bring out the pattern.  This was such a fun project to make.

Thursday, September 26, 2013

New owners @ Globecraft & Piccolo

Having decided to retire, founders Pat & Joanna Secrist recently sold Globecraft Memories & Piccolo Decor to another Michigan family company - SweetStamps.com.

New owners Jeff and Stacey Richardson are excited to add the fantastic products from Globecraft & Piccolo to their existing line of custom stamps, inks, EPs and dies for paper crafting.

SweetStamps.com will be carrying a large selection of G&P items in their booth at tradeshows throughout the country, and Stacey will demo with some favorites {Piccolo accents, Embossing Enamels and Instant UV Resin}!

Project tutorials and inspiration along with online shopping will still be available at www.globecraftmemories.com and www.piccolodecor.com.

We will be looking for new Design Team members soon, so stay posted and follow this blog to keep up-to-date!

Wednesday, August 28, 2013

A 3D Enamel Gel Tip

It is Laura here.  I just LOVE using the 3D Enamel Gels! They have gorgeous colors that blend well. I love how they can be used to add a little color to non porous surfaces, especially metals. I also enjoy playing with thin layers, which can be very transparent. What I often forget, though, is right in the name - they are 3D.  If applied directly from the bottle, they create a three dimensional look.  That is how I used them on this scrapbook page:
I created the look of dripping honey, by squeezing the gel right from the bottle.

Piccolo 3D Enamel Gels are incredible - you can use them anywhere!

Wednesday, August 21, 2013

All That Glitter!

Good morning!  Chrissy here to let you in on a sparkly little gem. If you are like me, you love glitter and the more sparkly it is, the better! Piccolo's Pure Sparkle Glitter (available in silver or gold) is just as twinkly and vibrant as some of the more expensive glass glitters I've seen.

I'm here to show you a quick and easy way to dress up some plain ol' wood shapes I picked up at the craft store using Glastique and the amazing Pure Sparkle Glitter.


It really is simple.  Simply cover your shapes with the Glastique then pour on the bling!


Look at all that sparkly awesomeness! Shake the excess off into the glitter jar and set aside to dry.


Once the Glastique has dried, add another layer over the top of the glitter to seal it and anchor it all down. These stars are going to be used on a history project my daughter needs to do.

Thank you for taking a look at my final post with Globecraft & Piccolo.  It's been a fun ride and I do hope to see some of you around the craftin' block!

Cheers!


Wednesday, August 14, 2013

A Tip for The Fine Line Applicator Tip

Have you ever used the Globecraft Fine Line Applicator Tip?  It creates a really beautiful fine line!  I use it all the time with the 3D Enamel Gels.
It creates the sort of details that you just can't get without it.  It is especially useful for eyes and other such detailing.
The only problem is that, being so fine, it is more difficult to keep clean.  That is why I am offering this super easy tip:  fill the container it comes in with water, and store the tip in it. That way, it is always clean and ready to go when you are!
Thanks for stopping by, I hope my tip was useful for you!

Wednesday, August 7, 2013

Seeing the colors of G&P Embossing Powders


Hello! Tracy here with another tip using Globecraft & Piccolo products.

I love using G&P Enamel powders in artwork, there is so many colors and textures I keep finding new things to do with them. Though with Globecraft having so many completely different colors it is hard to choose which one I would like for a project. So I came up with a way to create an index of embossing powders to keep track of my collection!


Enamel powders generally look very different in the jar from they are finally heated. I can keep track of what the final colors would look like by applying them to scrap pieces of bookboard.


You can use any piece of scrap bookboard or chipboard you like, I use the ovals since I do a lot of home decor work and want to see how it would look on a larger surface. In this photo I am apply G&P Enamel & Embossing Powder Adhesive to the bookboard oval.


I like to apply two coats of embossing powder to the bookboard for intense color but it is not a necessity. You can use the total heat set technique or do half & half: total heat set for the first coat, and flash heat set the second.


After the enamel powder has cooled I write the name of the color on the back and keep my color index of enamel powders with the jars of powder. Anytime I have a project I want to see what colors would look best I pull out the index! :)

Inspired by the Tips and Tricks you see on the Globecraft & Piccolo blog? Post your projects on the Globecraft & Piccolo Facebook page!

Until next time, Safe travels!

Thursday, July 25, 2013

An artsy wall hanging

It's so much fun to get crafty when you make items to hang on your wall, don't you think?
Hi, I'm Diana and I'm going to show you how I created a beautiful set of wall hangings!


You'll need some Aleen's Glue, Craft frames, and vintage text pages, to start.


Glue the textbook page onto the back of the frame.


Take two more sheets of textbook paper, and rub a couple of colors of oil pastels onto the page. In layering colors, you'll see how they naturally blend together. Nice, right? Now, spray it with workable fixative, and let it dry.


You can certainly use your own art, but being pressed for time, I opted for a rubber stamp. Use a nice dark color. Let it dry, then cut out the stamped image.


Now you can glue the stamped image onto the middle of your frame. At this point, think of what you want to go around the image. I decided on seed beads and gold sparkle glitter by Globecraft & Piccolo.

Also, I used a little heart shaped bead that I sculpted.
After glueing the beads, I went and used UV Resin, to ensure that they don't go anywhere.


Now, get a sturdy piece of cardstock, and some yarn for hanging, and glue it, sandwiching the yarn in between the cardstock and the frame, and let dry.

You can also use some Glastique finishing glaze around the rest of the piece.
And that's that! Once it's dry, you've got something that looks like this:


You can do a lot with something like this! Even use pictures of your kiddos, if you want.
Happy Crafting! Visit my blog for more ideas: Diana Gonzalez

Tuesday, July 23, 2013

A Turtle Pendant--Metals and Enamel Gels


It's Laura here.  Today, I am sharing a turtle pendant with you.  It features Globecraft 3D Enamel Gels and Instant UV Resin.  Let me explain how it is done.

Materials:
Globecraft Acrylic Tag Bezels
Globecraft 3D Enamel Gels in Ultramarine Blue
Globecraft 3D Enamel Gels in Deep Blue Sky
Globecraft 3D Enamel Gels in Blue Green
Globecraft 3D Enamel Gels in Dark Green
Globecraft 3D Enamel Gels in Avocado
Piccolo Instant UV Resin
Piccolo Easy Grip Tweezers
Manicurist UV Light or Direct Sunlight
Large Round Earring
Metal Turtle Chain Link
Bail
Chain
Sharpie
Wire Cutters
Craft Knife
Sandpaper
Pin
Paper Towel

Directions:


 1)  Remove the earring finding from the hoop.


 2)  Chose the bezel that is at least as large and closest in size to your metal piece.


3)  Use a Sharpie to trace around the metal.


4)  Cut on or just inside the Sharpie line.  You will either need patience (which I have none) or scissors (fortunately, I have these) to remove the excess acrylic.


5)  Rub and rotate the edges of the acrylic on the sandpaper.  You are trying to make the acrylic the same size or slightly smaller than the metal.

6)  Remove the blue plastic, wipe and set aside.


6)  Use the wire cutters to remove the "eye" ends from the turtle.


7)  Squeeze the blue Enamel gels onto the acrylic.  You may wish to make the trails "swirly."


 8)  Use a pin to swirl the colors together.


9)  While the enamel is still wet, place the metal on the acrylic and set aside.


10)  Squeeze the Dark Green Enamel Gel over the turtle.


11)  Use a little paper towel to gently rub off some of the Enamel Gel.


12)  Squeeze some of the Avocado over parts of the turtle and blend a little with the pin.


13)  Use the tweezers to place the turtle onto the project while the blue gel is still wet.


14)  Let dry completely.


15)  Squeeze Instant UV Resin over the project and cure under UV Light or in the sun.

16)  Repeat step 15 a few times, alternating between the front and back of the project until you are satisfied.  I used two coats on each side.


17)  Use the bail to attach the project to the chain and wear!


Thanks for stopping by today.  Come check out my blog at www.rememberinglifesmoments.blogspot.com any time!

Laura Drahozal
Remembering Life's Moments