Wednesday, September 12, 2012

Love Card

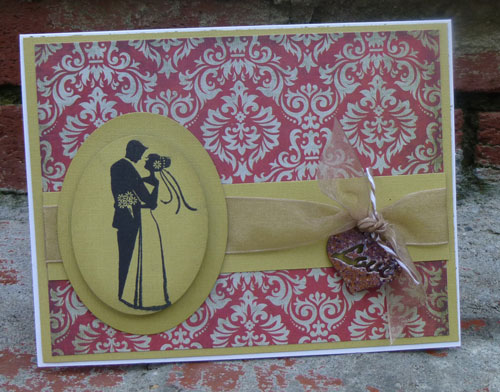
Good morning, Steph here with a quick and easy way to incorporate Piccolo charms in a project. 

Piccolo charms can be used for all types of projects from jewelry to embellishments.  I decided to use the heart charm from Heart Charms H001 set as an embellishment on a wedding card.  I gently poked out the word from the heart charm and set it aside to use on another project.  Using Enamel Powder Adhesive, I coated the heart charm, then added Enchanted Aubergine  and Brownstone powders on top.  Once heat set,  I added several light coats of Glastique. This made the heart a little stronger as well as giving it a nice glossy effect.


After completing my card, I just tied the charm onto the bow.


The charm was just the perfect finishing touch for this card.  Just remember, the charms may be small but they do pack a big punch for all your crafty endeavors.

Thanks for stopping by today.


Monday, September 10, 2012

Peekin'

Want a peek at something brand new???!!!


Pat Secrist, owner of Globecraft Memories, created this jewelry assortment a few days ago.  The jewelry features our Piccolo Enamel Powder, our "coming soon" Piccolo Enamel GELS, and of course, our favorite product: Glastique!


We're so excited to share with you in the coming weeks so stay tuned! Follow us on Facebook and twitter for updates as well.

Sunday, September 9, 2012

This greeting card stands strong!

Greetings! Linda here with my very first attempt at using our Easel Greetings. I've decided I rather like these cute little greetings. They're pretty versatile as to what you can do with them and I have ideas for more still floating around in my head.

The Easel Greetings come five to a pack so you can make several at a time, and they fit inside a standard A2 envelope for easy mailing.

I started by embossing the front of my Easel Greetings with Paisley, a M-Bossabilities folder from Spellbinders. The front of my Easel Greetings easily fit inside the folder for running through the Vagabond. I inked it with Vintage Photo Distress Ink and spritzed it with a mixture made from Heirloom Gold Perfect Pearls and water in a mister. I love the fact that the Easel Greeting is heavy duty enough to stand up to embossing and spritzing. After using a heat tool to speed up drying, I went around the edges with Walnut Stain Distress Ink.

I really wanted to add layers to the card so cut a scallop rectangle from Spellbinders Classic Scalloped Rectangles Large then used my paper trimmer to cut a smaller rectangle to fit inside it. I also added a pretty edge cut from the Sizzix Alterations die Distressed Doily.

All those pieces were inked with Vintage Photo Distress Ink as well and the edges of the inner rectangle and the stamped sentiment piece were further distressed with an edge distressor. The Distressed Doily and the stamped sentiment were also spritzed with the homemade Perfect Pearls mist then I stitched the scalloped mat and inner mat on the sewing machine and left the threads dangling to add to the Vintage look.

The card needed some movement so I pulled the Piccolo Butterfly Flurry No.12 from my stash. I love these butterflies! They come in various sizes on the card and the little flourish with them is just so cute!


I dabbed some Piccolo Enamel Powder Adhesive on the three butterflies I selected to use and sprinkled them with Vintage Gold Enamel Powder then heat set. There are two coats of Vintage Gold Enamel on the butterflies and flourish. I heated the three butterflies briefly -just enough to melt the enamel so it works like a glue - and sprinkled on some Pure Gold Sparkle Glitter. The Pure Gold Sparkle Glitter is so, so pretty and gives so much dimension to the project. I added some antennae to the large butterfly by bending some wire then added two thin coats of Glossy Glastique to all the butterflies, allowing each coat to dry in-between.

Once the Glossy Glastique dried all that was left was the assembly and the addition of a few pearls and a pretty bow. This beautiful card is all set to send on its way!

Posted by Linda Neff: http://linda-neff.com


Saturday, September 8, 2012

Faux So Real!


Jewelers actually think our metallic enamels are REAL metal.  Apply Metallic Enamel Powder to our Piccolos and heat set to achieve the look of metal for lightweight and affordable jewelry pieces. 

Pat Secrist shares how to create this look in this video:


What would you create?

Thursday, September 6, 2012

Memories on Display


The Globecraft Memories  Brag Book is a wonderful way to display photos of your child's summer fun memories and first days back to school. Its a scrapbook that can be displayed like a frame!


Another idea is to save precious, bulky mementos in a box decorated with a little bubble frame kit!  This also makes a precious gift. Simply add the decorated bubble frame to a papier mache box, available at most craft supply stores.


Want to create one of these projects now? 
Enjoy 25% on off on your next order on our website.

Happy Creating!

Tuesday, September 4, 2012

Do You OMBRE?

Good morning Globecraft friends, 
Pinky here with an "ombre" project today!
Right now all the rage is OMBRE from hair coloring to clothing, 
I see it everywhere, so I thought it would be fun to apply the same technique 
the Piccolo Enamel Powders and a card!
You will need to-
 Choose 2 Piccolo Enamel Powders. 
Choose your  Card Decor Set
 Step 1. Using Piccolo Enamel Powder 
Adhesive, dab onto top HALF the Card Decor Chipboard piece. 
 Step 2. Coat top half of chipboard with Piccolo Enamel Powder
Step 3. Heat set using Heat Gun. 
 Step 4.  Using Piccolo Enamel Powder 
Adhesive, dab onto bottom HALF the Card Decor Chipboard piece.
Step 5. Coat top half of chipboard with Piccolo Enamel Powder
 Step 6. Heat set using Heat Gun. 
Step 7. Using similar ink color (mix between the two) dab lightly all over. 
Step 8. Wipe off with paper towel. 

(This step will add a little bit of tie in on the colors)
 That's it! Now you have an "ombre" chipboard piece ready for 
your layout, card or home decor project!
So what fun will you have this week with the Piccolo Enamel Powders?


Sunday, September 2, 2012

Dream of Angels

Charlotte here with a black and white  Globeframe!   With the Globecraft Memories Bubble Frames, you can create a beautiful keepsakes.  I wanted to create an elegant memorial piece to place in my office.   
GlobecraftMemories Products
Classic Story Tellers Grand Rectangle Globeframe
Piccolo Fine Black Enamel Powder

Other Products
Melissa Frances Wing Embellishments
Mini Canterbury Charcoal Petaloo Flowers
Enchanted Bo Bunny Trinkets
Enchanted Bo Bunny Paper
Blue Moon Metal Charms
Zva Flourish
Scraps of Darkness hat pin
COlorBox Mix'd Media Black Ink

Instructions
Apply a coat of the Piccolo Embossing Powder Adhesive to the front of the frame.

Immediately after applying the adhesive, sprinkle Piccolo Fine Black Enamel Powder over the entire surface of the frame. If you are using a tidy tray, gently tap the corner of the charm on the tray to remove all the excess embossing powder.
Using strong adhesive, adhere frame and bubble to front of frame. Layer and adhere frame an add embellishments inside the globe.  

When the frame is assembled, add embellishments to the front of the frame.  


Cover the entire easel with coordinating paper.  Follow the instructions in the kit to assembling the easel.  Adhere the easel to the frame. 

Such a fun and easy project!


Thanks for stopping by GlobeCraft Memories Blog