Friday, February 28, 2014

Tweet Tweet! These Are Sweet

Hello there!
I don't know about you, but I'm itching for spring.
Today I have for you not one but two sweet little birdie pendants in lovely spring colors. 


This project has a short supply list and comes together pretty easily.
Want to make 'em?
Let's go!

Supplies:

Bird charms CA101
Enamel Powders: Brownstone & Turquoise Lagoon
Enamel Adhesive Fluid
Jump Rings
Heat gun, toothpick, big heavy book


Punch out two solid birds and one swirly bird. 
Separate the inside from the frame.


Coat the solid birdies with the Rose Pearl enamel gel.
I LOVE this color!
(I used a pretty thick coat, so they sat overnight to dry)
Use the Enamel Adhesive Fluid and powders to coat the other two bird pieces.
I REALLY heated them up to get a nice smooth finish.


Once your pink birdies are completely dry, use the toothpick to
put E600 glue onto the backs of the two swirly pieces.
Add one swirly piece to each pink piece, stick 'em under a heavy book for a few minutes,
and let dry (preferably overnight).


Add a jump ring and add to the necklace.
Aren't they pretty?! 

Thursday, February 27, 2014

My hope is found.....


Good morning peeps --- Teresa here with a tribute to many many people. Meet HOPE. I have known I wanted to make her, and the new Aged Pink Powder gave me the very last item I needed.

She looks a lot more complicated to assemble than she actually is. So let's jump on in. Shopping first.

from the New Release Items.

- Aged Pink Enamel powders
- Aged White Enamel powder

Other Globecraft Piccolo products.
- Cranberry Wine Enamel Powder
- Poodle Skirt Enamel Powder
- Enamel Adhesive
- UV Resin
- Matte Glastique Finishing Glaze
- Snowflake Accents 
- Bejeweled Snowflake Accents


Miscellaneous Supplies
- Cross Stitch Fabric (I used a 32 Count Linen in Ivory)
- Sparkly Floss in pink
- small bit of ivory cardstock
- glitter paper for wings
- silver stamp ink (the London Fog from Sweet Stamps is really pretty)
- a tiny lace medallion for her halo (I made my own.)
- buttons to use as spacers.
- silver sewing thread
- a mounting board
- a tiny bit of gesso
- tiny bit of pink glitter

Now here we go.


I stitched the word HOPE at the center bottom of my fabric using the pink floss. (Link to a free PDF of the font)


I covered all of my Piccolos with a bit of gesso. The sides will show and I carefully made sure to cover them. Wait patiently for this to dry.


Then I embossed all of my shapes in assorted Pinks.


The ones above are Cranberry Wine (this is my current favorite)


The ones above are Poodle Skirt


The top one above is Aged Pink and the smaller one is Aged White.


I stamped my pretty angel's face and then added a bit of the Aged White Powder to her hair. I even used a paintbrush and flecked a little into areas in her hair. I cut her out to fit my medallion.


After embossing her accents - I covered her with UV Resin and set it outside in the sun to cure. In sunshine it takes about 3 minutes. 


I added a medallion behind her pretty face. I made my own to give her a halo effect. I simply glued the resin piece to this.


I cut wings from some glitter paper.  Then (using my finger) smeared the Glastique on them waited just a moment and sprinkled with some pink glitter.

The Glastique is a fabulous adhesive for the glitter. See the detail below. By waiting just a moment before I added the glitter, some of the Glastique dried and the remaining areas held the glitter.


Now all of our components are ready.


I sat down and stitched her bits and pieces to the fabric.


Stacked some, using buttons for spacers. I gasped when I started the stacking. It gave great dimension to the artwork.


After I stitched everything down, I added her face. I simply glued it on with E6000.

Then I wrapped her around an 8x10 board. I have her in a shadow box now - but she could be framed or mounted on canvas.


I love the various ways you can combine the Piccolo shapes.

A similar angel could be made from flowers, from flourishes, even from the various gears.

I do hope you will try your hand at some of these ideas son.

Wednesday, February 26, 2014

Kitty Loves a Birdie!

 Happy Wednesday everyone! leslierahye here to share with you this fun pin/pendant. 

All pieces were enameled by smearing Enamel Powder Adhesive Fluid to the surface of the chipboard pieces and dusting with 1-2 coats of Enamel powder and then heat setting. The bird cage I used only one coat of powder...I like the antique feel the Victorian Bronze gives in one coat. The bezel was primarily Mermaid Tears and then a light sprinkle in one or two places with the Aged White created the lighter areas. 
The pieces were assembled with Glastique and then the corners, kitty, birds and cage were coated with Glastique to give them an extra gloss. An extra coat of Glastique on the kitty gives him a more 3 dimensional look. A note about the bezel...I left the loop at the top because I wanted this piece to be flexible in how it can be worn. I will be adding a pin-back to the back of it so I can wear it with a sweater or scarf, but I might want to wear it as a pendant on a necklace so I am keeping the loop for extra support for the necklace.


I hope you enjoyed my project! Thank you for stopping by today!

Tuesday, February 25, 2014

Mini Canvas

Morning everyone, Tracy here. 
I have been creating with some of the new release this week, and have created a mini canvas. 

This was so fun to do. I coloured the canvas using Distress inks and then stamped along the bottom using Tall Grassy Flowers Stamp, i then dabbed adhesive fluid across the grasses and sprinkled a mix of Mermaid Tears Embossing enamel & Aged White across and heat set, I then took two of the new 3D Enamel Gels  and randomly dotted them to give them the look of flowers. 
The birds are from the Lil flowers, Leaves, Birds & Bows set and I have given them two coatings of UTEE in White and then rubbed some gold wax over them. 
The sun is from one of the new Piccolo Sets, Spring Accents, I did something slightly different with the sun.I cut it so it would fit in the corner  & then used my black Spectrum Noir and Coloured it so it was all black (including the edges), I then gave it a thin layer of 3D Enamel Gel In Daffodil Pearl, whilst it was still wet I sprinkled some Aged White over it and heat set, I then took the 3D Enamel Gel In Daffodil Pearl and put another layer on and waited 5-10 mins before wiping some of the gel away...I really love effect this has given and will certainly be using it more in the future. 
I hope you like my mini canvas, don't forget to check back each day for some wonderful creations from the rest of the fab team. 

Items used- 
Mini Canvas
Distress Inks


Monday, February 24, 2014

Faux Stained Glass


Have you ever wanted to create a design in stained glass? Beautiful, translucent colors outlined in silver or black? Me, too!

Today's project is an easy faux stained glass. When I saw the Floral Eggs in the New Spring Release, they reminded me of stained glass hanging in the kitchen window when I was growing up and I knew what I would be creating next!

Gather your Globecraft & Piccolo supplies:
*French Oval Frame Kit (we're using the decorative frame)


Other supplies:
Tim Holtz Die Baroque
Tim Holtz Die Mini Baroque
Grid stamp
Vellum Cardstock
Foam adhesive
Ranger Melting Pot
Copics in your favorite daffodil colors

* these are items from the Spring Release

Floral Eggs is a set of 15 - 3 of each gorgeous design. Choose your favorite and go over the design with the Mars Black 3D Enamel Gel. Let dry.


Warm up the Melting Pot. Place a craft sheet in the tray and lay the Floral Egg on top. Sprinkle the Ultra Thick Clear Enamel Powder liberally over the piece. Try to keep most of the powder over the egg, but don't worry if it gets outside the design.


Let the powder melt.


Turn off the Melting Pot and let cool. Gently press on the edges to flatten the egg, if necessary, as it cools. Once completely cool, remove the egg from the craft sheet. Use scissors to trim off any edges. 


Color with Copics.


Using the Daffodil Pearl 3D Enamel Gel, trace over the design on the decorative frame from the French Oval Frame Kit. Set aside and let dry.


Die cut the front of the card base using the Mini Baroque die. Die cut a green panel and the vellum cardstock using the Baroque die. Cut out the middle of the green panel using the Mini Baroque.

Adhere panels using the photo for reference.

Using Glastique, apply a thin layer to the back of your egg and adhere to the vellum. Decorate with pearls and your favorite sentiment!

Sunday, February 23, 2014

Basket of Bunnies


I don't know what could be better than two chocolate bunnies in your Easter basket!  For my card today, I have used the newly released Piccolo Chocolate Bunnies, coloring them with Burnt Umber 3D Enamel Gel.  They fit perfectly in my Cheery Lynn Designs Spring Basket 1 adding a bit of greenery with my Cheery Lynn Designs Grass Border die.


One of the great things about adding Piccolo's to your card is their low profile.  You know that they won't be damaged when mailed.  Another of the new Spring Release Piccolo's is Stacey's Stacking Flowers.  You get a total of 24 flowers in this set, what a bargain.  I used Turquoise Lagoon Embossing Enamel on the larger flower and Copper 3D Stamp Paint on the smaller petal.  Notice you can still see the detailed lines on the petals.  I added a gem to the center of the flower to finish it off.  My last step was to add some leaves die cut with my Cheery Lynn Designs Holly Leaves.  Finished size is 4.25 x 5.5 inches.  

Saturday, February 22, 2014

Elegant B&W card and Globecraft & Piccolo's New Spring Release!


I hope you have been looking at the Globecraft & Piccolo Blog this week, you have GOT to see all the goodies my Teamies came up with to celebrate the New Spring Release

I love black & white, I think it is so elegant – and to continue with the elegant theme, I made this “Thinking of You” card using one of the NEW Flourish sets.  Honestly, I had another project planned, but life got in the way, so I am sharing this lovely card.
Here is the finished card
The card was simple as I had all the ingredients here.  It’s larger than most cards I make measuring 6” x 6”, but I wanted to give a proper showcase to the embellishments and the lovely textured paper I used.

This is all you need to make this card:
  • NEW A157 Vintage Corner Flourishes 
  • Micro White Embossing Enamel
  • Enamel & Embossing Powder Adhesive Fluid
  • 6” x 6” black white base
  • 5 ¼” x 5 ¼” embossed black cardstock (I used paper from Francis Meyer, but you could just as easily make your own)
  • Sentiment (I used an old SU! set called “All Year Cheer”)
  • Black Cardstock
  • Pop Dots 
  • Cream & Black Strip (I got mine from GCD Studios Paper Pad “Paris Nights”)
  • White Cardstock for your Sentiment
  • Ranger Archival Ink in Jet Black
First, emboss your Flourishes with the Micro White Powder.  I embossed the flourishes about 6 times, coating it with more Embossing Fluid & Micro White Embossing Enamel each time to get the coverage I wanted but since the powder is micro fine I hardly used any of it at all.  Set these aside.  Stamp your sentiment on the white card and trim to a rectangle, then trim a piece of black cardstock to mount it on, making sure you leave enough room

to place your flourishes.  I fooled around with the placement of the flourishes quite a bit before I was happy and I even trimmed the square down further once I had attached the flourishes on (which was pretty gutsy, if I had made a mistake I would have to think of another project!).  

The beautiful embossed black cardstock
 Then I cut the 5 ¼” square out of the embossed cardstock, adhered that to the base, put the cream and black strip on, then pop dotted the final square that has the flourishes and sentiment on it to give it that much more texture (even though you can't really tell by the photos).

That’s it!  I love the look of the embossed flourishes with the embossed cardstock.  I hope you like it! Blessing to you & yours, Christi

Friday, February 21, 2014

Time for a little Spring


I am so very excited to play with the new spring colors of enamel gels!
Aren't they pretty?


Today I have a pair of pretty little earrings for you. 

Want to make them?
YAY!
Let's do it!


What you need:
Enamel gels: Silver, Coral Pearl, Rose Pearl, Daffodil
Earring wires, jump rings


One side at a time, color each flower with enamel gel. 
Then color the frame with silver enamel gel. 
Allow to dry, flip over and repeat on the other side.


Once it's all dry, coat the flowers with matte Glastique
and the frame with glossy Glastique. 
Allow to dry thoroughly, flip over, and repeat.

Once the Glastique is completely dried, add a jump ring to each charm
and add them to the earring wires.
There ya go!

Thursday, February 20, 2014

Denim Blues -----

It's new release week. And my-oh-my are the new items wonderful. Teresa here today with some great earrings that are just prefect to dress up my daily blue jean and t-shirt wardrobe. 


Lets get started.


From Globecraft and Piccolo you will need:
- Vintage Corner Flourish Piccolo Set A157
- Glasstique Gloss Finishing Glaze
- Embossing Adhesive
- Deep Blue Sky Embossing Powder - this is a fine detail powder that can easily be used for stamped images.
- French Loop Earrings 

You will also need
- assorted beads for the charm in the center
- jump rings
- 2 short pieces of fine silver chain
- assorted jewelry assembly tools
- heatgun


Now then let's get started.


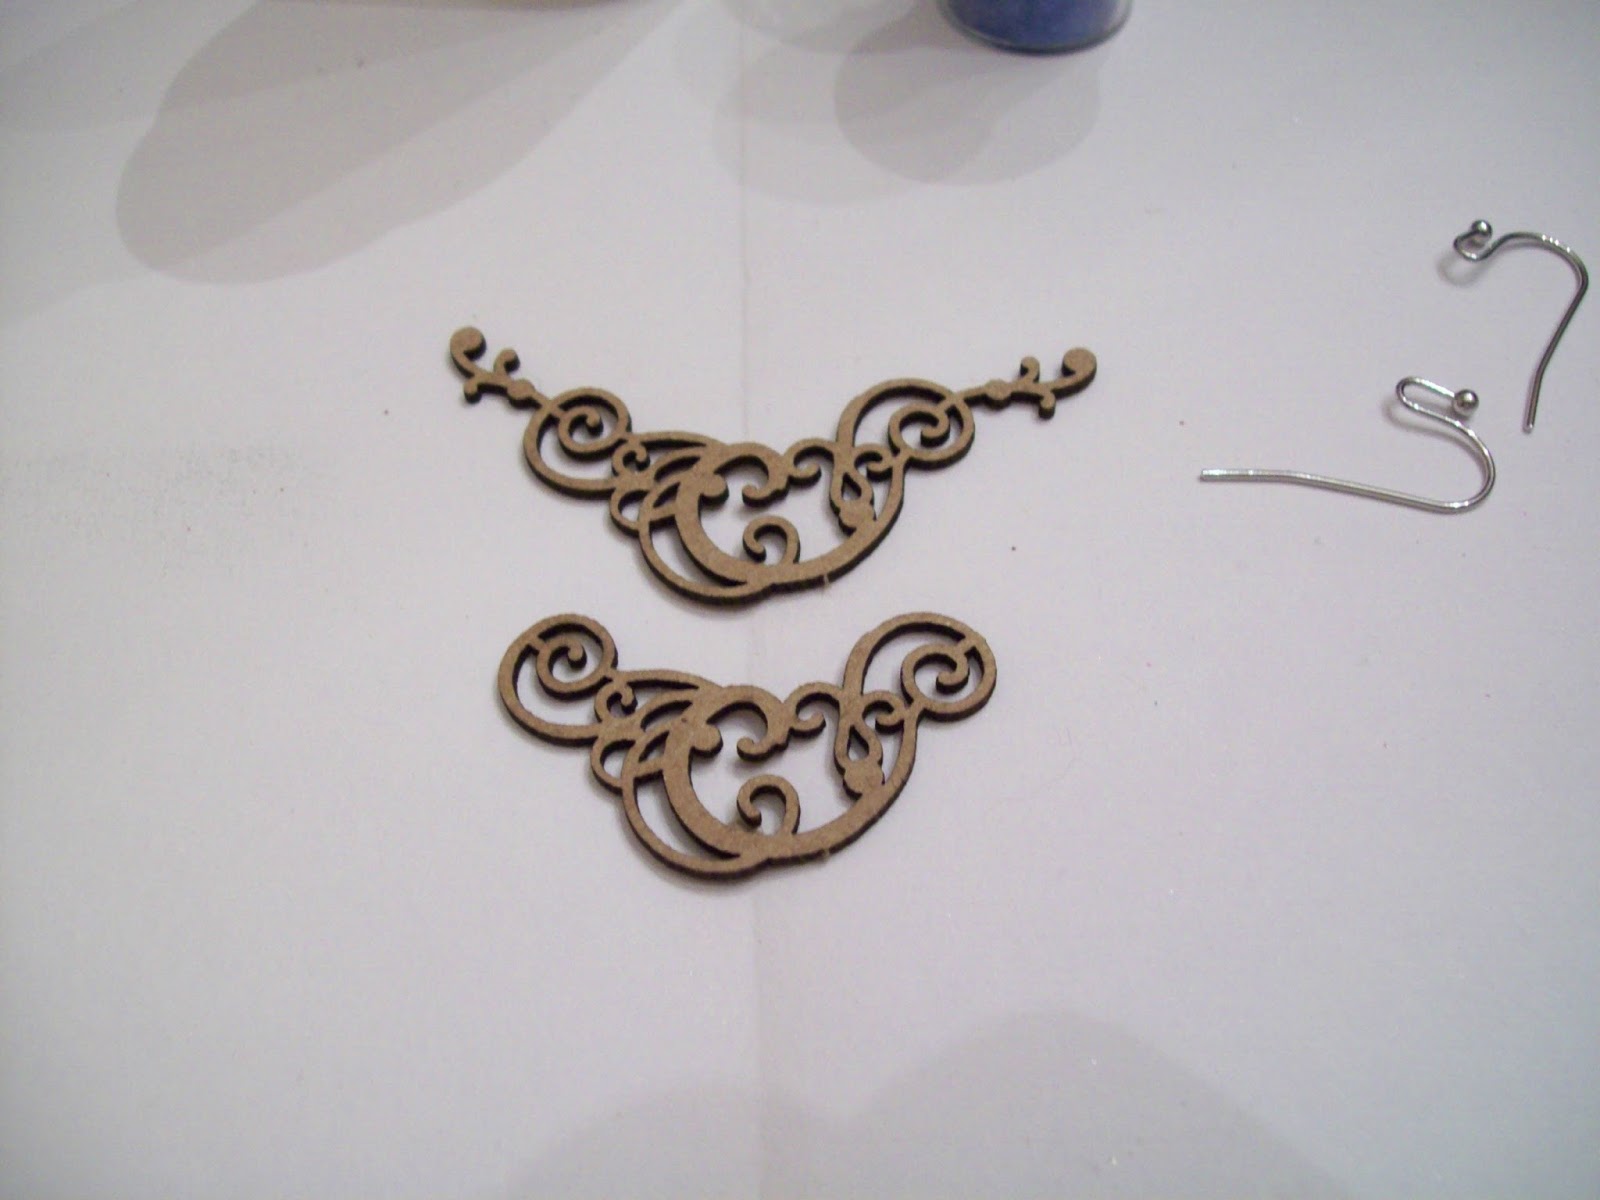
I took two of the Flourish Piccolos and decided quickly that I did not want those extensions on them. These are laser cut from book board and are easily trimmed with scissors.  The top flourish has the extended parts and the bottom one has been trimmed.


After trimming the Flourishes, I embossed both sides of each with the Deep Blue Sky Powder. (every time I try a new powder it becomes my favorite)

I put three layers of powder on these.  The process of embossing takes just minutes,  so layering is easy to accomplish.


Just look at those gorgeous blue tones.


To strengthen and gloss up the finish, I cover the shapes with gloss Glastique Glaze. For the fine detail on these, I squeezed a bit of the Glastique onto a tiny paint brush and simply brushed it on.

Then I patiently waited for it to dry.


I gathered up my other bits while those were drying. You see two different charms there. I had a difficult time deciding which to use.


Just look at that blue.

After the shapes were dry, I added the chains to the tops of the curls with jump rings.

Added the charms (I finally decided the blue grey and silver looked best) and hooked through the earring loops.

Ready to wear.


The book board is light weight so these are VERY comfortable to wear. They can easily be customized for your wardrobe. Just pick your favorite color of the embossing powders.

There are some wonderful items in the NEW RELEASE section of the web site.

Have a beautiful day.